|
|
4 years ago | |
|---|---|---|
| docs | 4 years ago | |
| static | 4 years ago | |
| templates | 4 years ago | |
| utils | 4 years ago | |
| .gitignore | 4 years ago | |
| LICENSE | 4 years ago | |
| app.py | 4 years ago | |
| onnx_modifier.py | 4 years ago | |
| readme.md | 4 years ago | |
| readme_zh-CN.md | 4 years ago | |
readme.md
English | 简体中文
Introduction
To edit an ONNX model, One common way is to visualize the model graph, and edit it using ONNX Python API. This works fine. However, we have to code to edit, then visualize to check. The two processes may iterate for many times, which is time-consuming. 👋
What if we have a tool, which allow us to edit and preview the editing effect in a totally visualization fashion?
Then onnx-modifier comes. With it, we can focus on editing the model graph in the visualization pannel. All the editing information will be summarized and processed by Python ONNX API automatically at last. Then our time can be saved! 🚀
onnx-modifier is built based on the popular network viewer Netron and the lightweight web application framework flask.
The update log of onnx-modifier can be seen here. Currently, the following editing operations are supported:
- Delete/recover nodes
- Delete a single node.
- Delete a node and all the nodes rooted on it.
- Recover a deleted node.
- Rename the name of node inputs/outputs
- Add new nodes (experimental)
Hope it helps!
Getting started
Clone the repo and install the required Python packages by
git clone git@github.com:ZhangGe6/onnx-modifier.git
cd onnx-modifier

pip install onnx
pip install flask
Then run
python app.py
Click the url in the output info generated by flask (http://127.0.0.1:5000/ for example), then onnx-modifier will be launched in the web browser.
Click Open Model... to upload the ONNX model to edit. The model will be parsed and shown on the page.
Usage
 top left buttons (Graph-level-operations) top left buttons (Graph-level-operations) |
 sidebar buttons (Node-level-operations) sidebar buttons (Node-level-operations) |
Graph-level-operation elements are placed on the left-top of the page. Currently, there are four buttons: Preview, Reset, Download and Add node. They can do:
Refresh: Refresh the model graph to preview editing effects.In this version, the model graph is refreshed automatically as soon as an editting operation is invoked. So this button can be used much fewer than ealier versions.
Reset: Reset the whole model graph to its initial state;Download: Save the modified model into disk.Add node: Add a new node into the model.
Node-level-operation elements are all in the sidebar, which can be invoked by clicking a specific node.
Let's take a closer look.
Delete/recover nodes
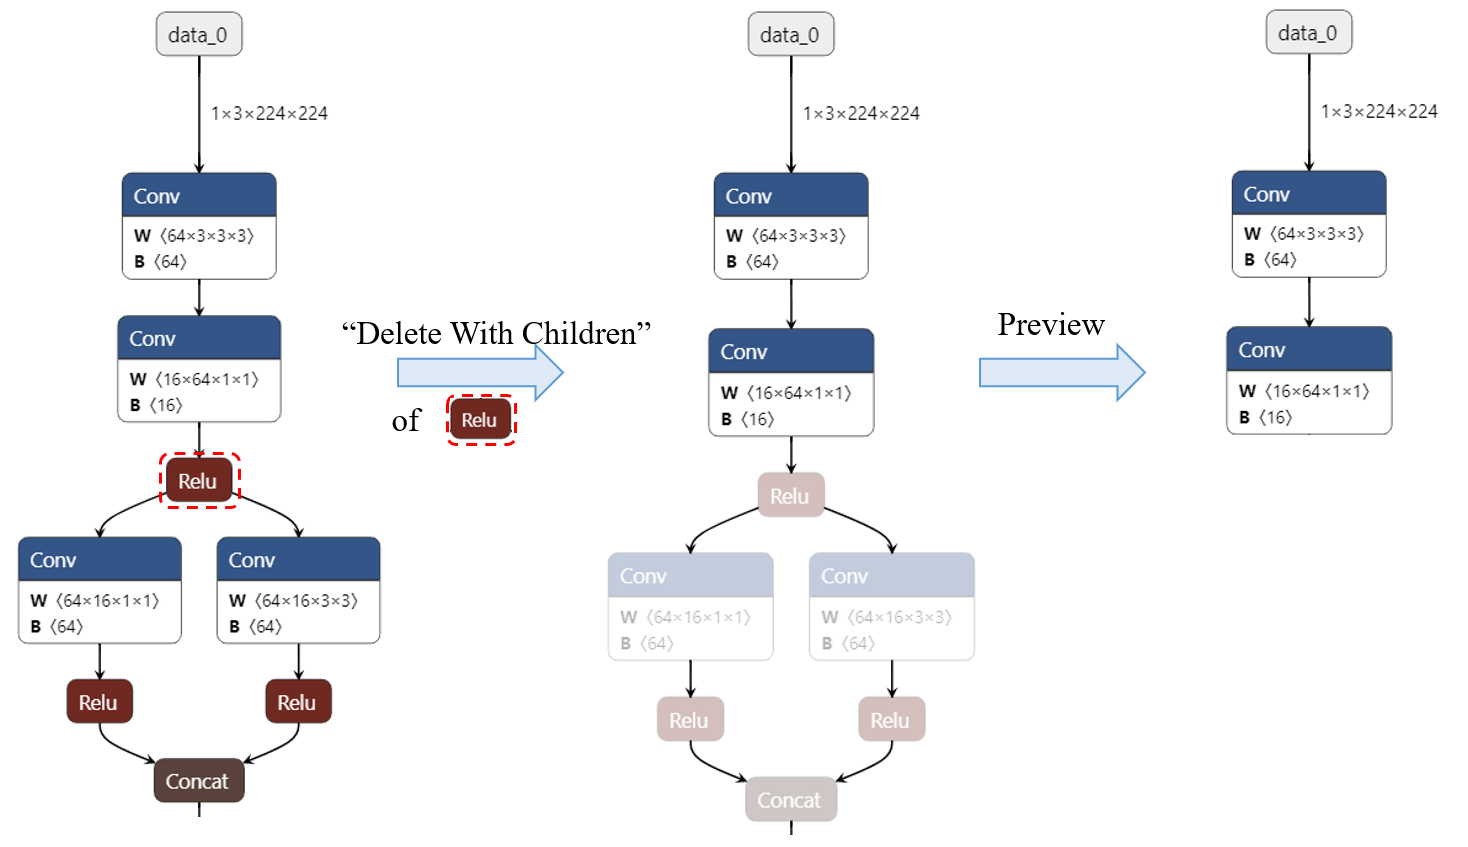
There are two modes for deleting node: Delete With Children and Delete Single Node. Delete Single Node only deletes the clicked node, while Delete With Children also deletes all the node rooted on the clicked node, which is convenient and natural if we want to delete a long path of nodes.
The implementation of
Delete With Childrenis based on the backtracking algorithm.
For previewing, The deleted nodes are in grey mode at first. If a node is deleted by mistake, Recover Node button can help us recover it back to graph. Click Enter button to take the deleting operation into effect, then the updated graph will show on the page automatically.
The following figure shows a typical deleting process.
Rename the name of node inputs/outputs
By changing the input/output name of nodes, we can change the model forward path. It can also be helpful if we want to rename the model output(s).
Using onnx-modifier, we can achieve this by simply enter a new name for node inputs/outputs in its corresponding input placeholder. The graph topology is updated automatically and instantly, according to the new names.
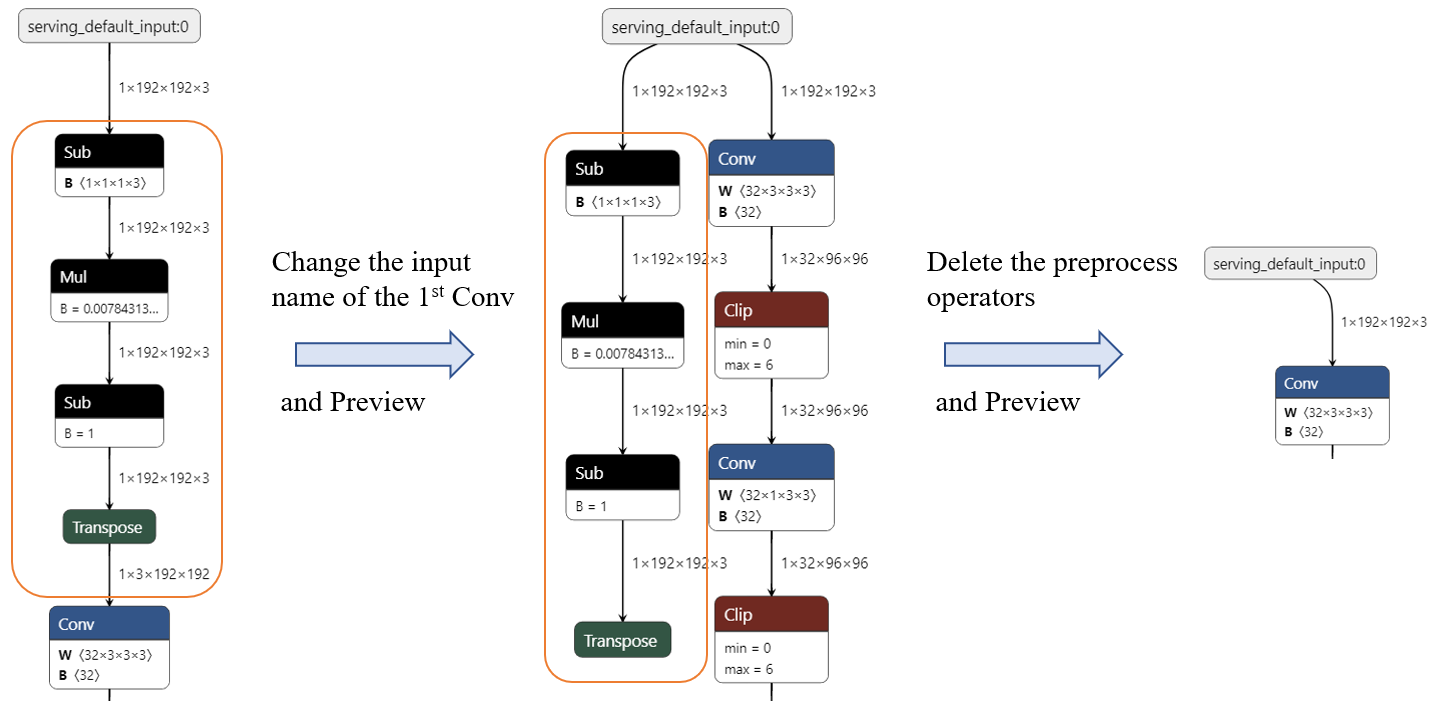
For example, Now we want remove the preprocess operators (Sub->Mul->Sub->Transpose) shown in the following figure. We can
- Click on the 1st
Convnode, rename its input (X) as serving_default_input:0 (the output of nodedata_0). - The model graph is updated automatically and we can see the input node links to the 1st
Convdirectly. In addition, the preprocess operators have been split from the main routine. Delete them. - We are done! (click
Download, then we can get the modified ONNX model).
Note: To link node
A(data_0in the above example) to nodeB(the 1stConvin the above example), it is suggested to edit the input of nodeBto the output of nodeA, rather than edit the output of nodeAto the input of nodeB. Because the input ofBcan also be other node's output and unexpected result will happen.
Add new node
Sometimes we want to add new nodes into the exsited model. onnx-modifier supports this feature experimentally now.
Note there is an Add node button, following with a selector elements on the top-left of the index page. To do this, what we need to do is as easy as 3 steps:
- Choose a node type in the selector, and click
Add nodebutton. Then an empty node of the chosen type will emerge on the graph. - Click the new node and edit it in the invoked siderbar. What we need to fill are the node Attributes (
undefinedby default) and its Inputs/Outputs (which decide where the node will be inserted in the graph). - We are done.
The following are some notes for this feature:
-
Click the selector and type the first letter for the new node type (
fforFlattennode for example), we can be quickly navigated to the node type. -
By clicking the
?in theNODE PROPERTIES -> typeelement, or the+in eachAttributeelement, we can get some reference to help us fill the node information. -
It is suggested to fill all of the
Attribute, without leaving them asundefined. The default value may not be supported well in the current version. -
For the
Attributewith typelist, items are split with ',' (comma) -
This feature is experimentally supported now and may be not very rebust. So any issues are warmly welcomed if some unexpected result is encountered.
Sample models
For quick testing, some typical sample models are provided as following. Most of them are from onnx model zoo
- squeezeNet Link (4.72MB)
- MobileNet Link (13.3MB)
- ResNet50-int8 Link (24.6MB)
- movenet-lightning Link (9.01MB)
- Converted from the pretrained tflite model using tensorflow-onnx;
- There are preprocess nodes and a big bunch of postprocessing nodes in the model.
onnx-modifier is under active development 🛠. Welcome to use, create issues and pull requests! 🥰
Credits and referred materials
- Netron
- flask
- ONNX IR Official doc
- ONNX Python API Official doc, Leimao's Blog
- ONNX IO Stream Leimao's Blog
- onnx-utils
- sweetalert