25 KiB
User manual
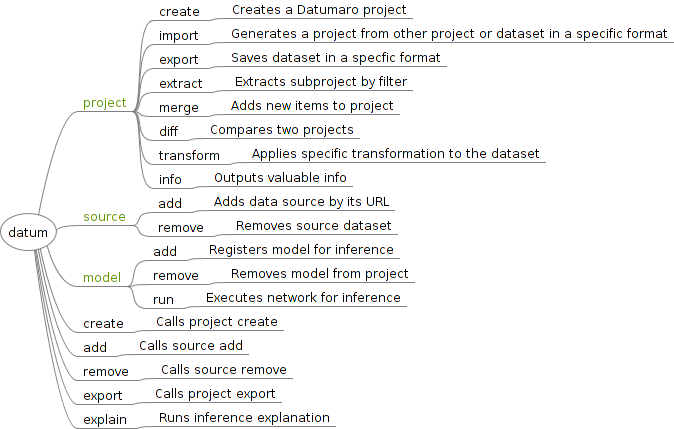
Contents
- Installation
- Interfaces
- Supported dataset formats and annotations
- Command line workflow
- Command reference
- Extending
- Links
Installation
Prerequisites
- Python (3.5+)
- OpenVINO (optional)
Installation steps
Optionally, set up a virtual environment:
python -m pip install virtualenv
python -m virtualenv venv
. venv/bin/activate
Install:
pip install 'git+https://github.com/opencv/cvat#egg=datumaro&subdirectory=datumaro'
You can change the installation branch with
.../cvat@<branch_name>#egg...Also note--force-reinstallparameter in this case.
Interfaces
As a standalone tool:
datum --help
As a python module:
The directory containing Datumaro should be in the
PYTHONPATHenvironment variable orcvat/datumaro/should be the current directory.
python -m datumaro --help
python datumaro/ --help
python datum.py --help
As a python library:
import datumaro
Supported Formats
List of supported formats:
- MS COCO (
image_info,instances,person_keypoints,captions,labels*)- Format specification
- Dataset example
labelsare our extension - likeinstanceswith onlycategory_id
- PASCAL VOC (
classification,detection,segmentation(class, instances),action_classification,person_layout) - YOLO (
bboxes) - TF Detection API (
bboxes,masks)- Format specifications: bboxes, masks
- Dataset example
- MOT sequences
- CVAT
- LabelMe
List of supported annotation types:
- Labels
- Bounding boxes
- Polygons
- Polylines
- (Segmentation) Masks
- (Key-)Points
- Captions
Command line workflow
The key object is a project, so most CLI commands operate on projects. However, there
are few commands operating on datasets directly. A project is a combination of
a project's own dataset, a number of external data sources and an environment.
An empty Project can be created by project create command,
an existing dataset can be imported with project import command.
A typical way to obtain projects is to export tasks in CVAT UI.
If you want to interact with models, you need to add them to project first.
Command reference
Note: command invocation syntax is subject to change, always refer to command --help output
Available CLI commands:
Convert datasets
This command allows to convert a dataset from one format into another. In fact, this
command is a combination of project import and project export and just provides a simpler
way to obtain the same result when no extra options is needed. A list of supported
formats can be found in the --help output of this command.
Usage:
datum convert --help

datum convert \
     -i <input path> \
     -if <input format> \
     -o <output path> \
     -f <output format> \
     -- [extra parameters for output format]
Example: convert a VOC-like dataset to a COCO-like one:
datum convert --input-format voc --input-path <path/to/voc/> \
              --output-format coco
Import project
This command creates a Project from an existing dataset.
Supported formats are listed in the command help. Check extending tips for information on extra format support.
Usage:
datum project import --help

datum project import \
     -i <dataset_path> \
     -o <project_dir> \
     -f <format>
Example: create a project from COCO-like dataset
datum project import \
     -i /home/coco_dir \
     -o /home/project_dir \
     -f coco
An MS COCO-like dataset should have the following directory structure:
COCO/
├── annotations/
│   ├── instances_val2017.json
│   ├── instances_train2017.json
├── images/
│   ├── val2017
│   ├── train2017
Everything after the last _ is considered a subset name in the COCO format.
Create project
The command creates an empty project. Once a Project is created, there are a few options to interact with it.
Usage:
datum project create --help

datum project create \
  -o <project_dir>
Example: create an empty project my_dataset
datum project create -o my_dataset/
Add and remove data
A Project can contain a number of external Data Sources. Each Data Source
describes a way to produce dataset items. A Project combines dataset items from
all the sources and its own dataset into one composite dataset. You can manage
project sources by commands in the source command line context.
Datasets come in a wide variety of formats. Each dataset format defines its own data structure and rules on how to interpret the data. For example, the following data structure is used in COCO format:
/dataset/
- /images/<id>.jpg
- /annotations/
Supported formats are listed in the command help. Check extending tips for information on extra format support.
Usage:
datum source add --help
datum source remove --help

datum source add \
     path <path> \
     -p <project dir> \
     -n <name>

datum source remove \
     -p <project dir> \
     -n <name>
Example: create a project from a bunch of different annotations and images, and generate TFrecord for TF Detection API for model training
datum project create
# 'default' is the name of the subset below
datum source add path <path/to/coco/instances_default.json> -f coco_instances
datum source add path <path/to/cvat/default.xml> -f cvat
datum source add path <path/to/voc> -f voc_detection
datum source add path <path/to/datumaro/default.json> -f datumaro
datum source add path <path/to/images/dir> -f image_dir
datum project export -f tf_detection_api
Extract subproject
This command allows to create a sub-Project from a Project. The new project includes only items satisfying some condition. XPath is used as query format.
There are several filtering modes available (-m/--mode parameter).
Supported modes:
i,itemsa,annotationsi+a,a+i,items+annotations,annotations+items
When filtering annotations, use the items+annotations
mode to point that annotation-less dataset items should be
removed. To select an annotation, write an XPath that
returns annotation elements (see examples).
Usage:
datum project extract --help

datum project extract \
     -p <project dir> \
     -o <output dir> \
     -e '<xpath filter expression>'
Example: extract a dataset with only images which width < height
datum project extract \
     -p test_project \
     -o test_project-extract \
     -e '/item[image/width < image/height]'
Example: extract a dataset with only large annotations of class cat and any non-persons
datum project extract \
     -p test_project \
     -o test_project-extract \
     --mode annotations -e '/item/annotation[(label="cat" and area > 99.5) or label!="person"]'
Example: extract a dataset with only occluded annotations, remove empty images
datum project extract \
     -p test_project \
     -o test_project-extract \
     -m i+a -e '/item/annotation[occluded="True"]'
Item representations are available with --dry-run parameter:
<item>
  <id>290768</id>
  <subset>minival2014</subset>
  <image>
    <width>612</width>
    <height>612</height>
    <depth>3</depth>
  </image>
  <annotation>
    <id>80154</id>
    <type>bbox</type>
    <label_id>39</label_id>
    <x>264.59</x>
    <y>150.25</y>
    <w>11.199999999999989</w>
    <h>42.31</h>
    <area>473.87199999999956</area>
  </annotation>
  <annotation>
    <id>669839</id>
    <type>bbox</type>
    <label_id>41</label_id>
    <x>163.58</x>
    <y>191.75</y>
    <w>76.98999999999998</w>
    <h>73.63</h>
    <area>5668.773699999998</area>
  </annotation>
  ...
</item>
Update project
This command updates items in a project from another one (check Merge Projects for complex merging).
Usage:
datum project merge --help

datum project merge \
     -p <project dir> \
     -o <output dir> \
     <other project dir>
Example: update annotations in the first_project with annotations
from the second_project and save the result as merged_project
datum project merge \
     -p first_project \
     -o merged_project \
     second_project
Merge projects
This command merges items from 2 or more projects and checks annotations for errors.
Spatial annotations are compared by distance and intersected, labels and attributes
are selected by voting.
Merge conflicts, missing items and annotations, other errors are saved into a .json file.
Usage:
datum merge --help

datum merge <project dirs>
Example: merge 4 (partially-)intersecting projects,
- consider voting succeeded when there are 3+ same votes
- consider shapes intersecting when IoU >= 0.6
- check annotation groups to have
person,hand,headandfoot(?for optional)
datum merge project1/ project2/ project3/ project4/ \
     --quorum 3 \
     -iou 0.6 \
     --groups 'person,hand?,head,foot?'
Export project
This command exports a Project as a dataset in some format.
Supported formats are listed in the command help. Check extending tips for information on extra format support.
Usage:
datum project export --help

datum project export \
     -p <project dir> \
     -o <output dir> \
     -f <format> \
     -- [additional format parameters]
Example: save project as VOC-like dataset, include images, convert images to PNG
datum project export \
     -p test_project \
     -o test_project-export \
     -f voc \
     -- --save-images --image-ext='.png'
Get project info
This command outputs project status information.
Usage:
datum project info --help

datum project info \
     -p <project dir>
Example:
datum project info -p /test_project

Project:
  name: test_project
  location: /test_project
Sources:
  source 'instances_minival2014':
    format: coco_instances
    url: /coco_like/annotations/instances_minival2014.json
Dataset:
  length: 5000
  categories: label
    label:
      count: 80
      labels: person, bicycle, car, motorcycle (and 76 more)
  subsets: minival2014
    subset 'minival2014':
      length: 5000
      categories: label
        label:
          count: 80
          labels: person, bicycle, car, motorcycle (and 76 more)
Get project statistics
This command computes various project statistics, such as:
- image mean and std. dev.
- class and attribute balance
- mask pixel balance
- segment area distribution
Usage:
datum project stats --help

datum project stats \
     -p <project dir>
Example:
datum project stats -p /test_project

{
    "annotations": {
        "labels": {
            "attributes": {
                "gender": {
                    "count": 358,
                    "distribution": {
                        "female": [
                            149,
                            0.41620111731843573
                        ],
                        "male": [
                            209,
                            0.5837988826815642
                        ]
                    },
                    "values count": 2,
                    "values present": [
                        "female",
                        "male"
                    ]
                },
                "view": {
                    "count": 340,
                    "distribution": {
                        "__undefined__": [
                            4,
                            0.011764705882352941
                        ],
                        "front": [
                            54,
                            0.1588235294117647
                        ],
                        "left": [
                            14,
                            0.041176470588235294
                        ],
                        "rear": [
                            235,
                            0.6911764705882353
                        ],
                        "right": [
                            33,
                            0.09705882352941177
                        ]
                    },
                    "values count": 5,
                    "values present": [
                        "__undefined__",
                        "front",
                        "left",
                        "rear",
                        "right"
                    ]
                }
            },
            "count": 2038,
            "distribution": {
                "car": [
                    340,
                    0.16683022571148184
                ],
                "cyclist": [
                    194,
                    0.09519136408243375
                ],
                "head": [
                    354,
                    0.17369970559371933
                ],
                "ignore": [
                    100,
                    0.04906771344455348
                ],
                "left_hand": [
                    238,
                    0.11678115799803729
                ],
                "person": [
                    358,
                    0.17566241413150147
                ],
                "right_hand": [
                    77,
                    0.037782139352306184
                ],
                "road_arrows": [
                    326,
                    0.15996074582924436
                ],
                "traffic_sign": [
                    51,
                    0.025024533856722278
                ]
            }
        },
        "segments": {
            "area distribution": [
                {
                    "count": 1318,
                    "max": 11425.1,
                    "min": 0.0,
                    "percent": 0.9627465303140978
                },
                {
                    "count": 1,
                    "max": 22850.2,
                    "min": 11425.1,
                    "percent": 0.0007304601899196494
                },
                {
                    "count": 0,
                    "max": 34275.3,
                    "min": 22850.2,
                    "percent": 0.0
                },
                {
                    "count": 0,
                    "max": 45700.4,
                    "min": 34275.3,
                    "percent": 0.0
                },
                {
                    "count": 0,
                    "max": 57125.5,
                    "min": 45700.4,
                    "percent": 0.0
                },
                {
                    "count": 0,
                    "max": 68550.6,
                    "min": 57125.5,
                    "percent": 0.0
                },
                {
                    "count": 0,
                    "max": 79975.7,
                    "min": 68550.6,
                    "percent": 0.0
                },
                {
                    "count": 0,
                    "max": 91400.8,
                    "min": 79975.7,
                    "percent": 0.0
                },
                {
                    "count": 0,
                    "max": 102825.90000000001,
                    "min": 91400.8,
                    "percent": 0.0
                },
                {
                    "count": 50,
                    "max": 114251.0,
                    "min": 102825.90000000001,
                    "percent": 0.036523009495982466
                }
            ],
            "avg. area": 5411.624543462382,
            "pixel distribution": {
                "car": [
                    13655,
                    0.0018431496518735067
                ],
                "cyclist": [
                    939005,
                    0.12674674030446592
                ],
                "head": [
                    0,
                    0.0
                ],
                "ignore": [
                    5501200,
                    0.7425510702956085
                ],
                "left_hand": [
                    0,
                    0.0
                ],
                "person": [
                    954654,
                    0.12885903974805205
                ],
                "right_hand": [
                    0,
                    0.0
                ],
                "road_arrows": [
                    0,
                    0.0
                ],
                "traffic_sign": [
                    0,
                    0.0
                ]
            }
        }
    },
    "annotations by type": {
        "bbox": {
            "count": 548
        },
        "caption": {
            "count": 0
        },
        "label": {
            "count": 0
        },
        "mask": {
            "count": 0
        },
        "points": {
            "count": 669
        },
        "polygon": {
            "count": 821
        },
        "polyline": {
            "count": 0
        }
    },
    "annotations count": 2038,
    "dataset": {
        "image mean": [
            107.06903686941979,
            79.12831698580979,
            52.95829558185416
        ],
        "image std": [
            49.40237673503467,
            43.29600731496902,
            35.47373007603151
        ],
        "images count": 100
    },
    "images count": 100,
    "subsets": {},
    "unannotated images": [
        "img00051",
        "img00052",
        "img00053",
        "img00054",
        "img00055",
    ],
    "unannotated images count": 5
}
Register model
Supported models:
- OpenVINO
- Custom models via custom
launchers
Usage:
datum model add --help
Example: register an OpenVINO model
A model consists of a graph description and weights. There is also a script used to convert model outputs to internal data structures.
datum project create
datum model add \
     -n <model_name> openvino \
     -d <path_to_xml> -w <path_to_bin> -i <path_to_interpretation_script>
Interpretation script for an OpenVINO detection model (convert.py):
from datumaro.components.extractor import *

max_det = 10
conf_thresh = 0.1

def process_outputs(inputs, outputs):
     # inputs = model input, array or images, shape = (N, C, H, W)
     # outputs = model output, shape = (N, 1, K, 7)
     # results = conversion result, [ [ Annotation, ... ], ... ]
     results = []
     for input, output in zip(inputs, outputs):
          input_height, input_width = input.shape[:2]
          detections = output[0]
          image_results = []
          for i, det in enumerate(detections):
               label = int(det[1])
               conf = det[2]
               if conf <= conf_thresh:
                    continue

               x = max(int(det[3] * input_width), 0)
               y = max(int(det[4] * input_height), 0)
               w = min(int(det[5] * input_width - x), input_width)
               h = min(int(det[6] * input_height - y), input_height)
               image_results.append(Bbox(x, y, w, h,
                    label=label, attributes={'score': conf} ))

               results.append(image_results[:max_det])

     return results

def get_categories():
     # Optionally, provide output categories - label map etc.
     # Example:
     label_categories = LabelCategories()
     label_categories.add('person')
     label_categories.add('car')
     return { AnnotationType.label: label_categories }
Run model
This command applies model to dataset images and produces a new project.
Usage:
datum model run --help

datum model run \
     -p <project dir> \
     -m <model_name> \
     -o <save_dir>
Example: launch inference on a dataset
datum project import <...>
datum model add mymodel <...>
datum model run -m mymodel -o inference
Compare projects
The command compares two datasets and saves the results in the specified directory. The current project is considered to be "ground truth".
datum project diff --help

datum project diff <other_project_dir> -o <save_dir>
Example: compare a dataset with model inference
datum project import <...>
datum model add mymodel <...>
datum project transform <...> -o inference
datum project diff inference -o diff
Explain inference
Usage:
datum explain --help

datum explain \
     -m <model_name> \
     -o <save_dir> \
     -t <target> \
     <method> \
     <method_params>
Example: run inference explanation on a single image with visualization
datum project create <...>
datum model add mymodel <...>
datum explain \
     -m mymodel \
     -t 'image.png' \
     rise \
     -s 1000 --progressive
Transform Project
This command allows to modify images or annotations in a project all at once.
datum project transform --help

datum project transform \
     -p <project_dir> \
     -o <output_dir> \
     -t <transform_name> \
     -- [extra transform options]
Example: split a dataset randomly to train and test subsets, ratio is 2:1
datum project transform -t random_split -- --subset train:.67 --subset test:.33
Example: convert polygons to masks, masks to boxes etc.:
datum project transform -t boxes_to_masks
datum project transform -t masks_to_polygons
datum project transform -t polygons_to_masks
datum project transform -t shapes_to_boxes
Example: remap dataset labels, person to car and cat to dog, keep bus, remove others
datum project transform -t remap_labels -- \
     -l person:car -l bus:bus -l cat:dog \
     --default delete
Example: rename dataset items by a regular expression
- Replace
patternwithreplacement - Remove
frame_from item ids
datum project transform -t rename -- -e '|pattern|replacement|'
datum project transform -t rename -- -e '|frame_(\d+)|\\1|'
Extending
There are few ways to extend and customize Datumaro behaviour, which is supported by plugins. Check our contribution guide for details on plugin implementation. In general, a plugin is a Python code file. It must be put into a plugin directory:
<project_dir>/.datumaro/pluginsfor project-specific plugins<datumaro_dir>/pluginsfor global plugins
Dataset Formats
Dataset reading is supported by Extractors and Importers. An Extractor produces a list of dataset items corresponding to the dataset. An Importer creates a project from the data source location. It is possible to add custom Extractors and Importers. To do this, you need to put an Extractor and Importer implementation scripts to a plugin directory.
Dataset writing is supported by Converters. A Converter produces a dataset of a specific format from dataset items. It is possible to add custom Converters. To do this, you need to put a Converter implementation script to a plugin directory.
Dataset Conversions ("Transforms")
A Transform is a function for altering a dataset and producing a new one. It can update dataset items, annotations, classes, and other properties. A list of available transforms for dataset conversions can be extended by adding a Transform implementation script into a plugin directory.
Model launchers
A list of available launchers for model execution can be extended by adding a Launcher implementation script into a plugin directory.