31 KiB
User's guide
Computer Vision Annotation Tool (CVAT) is a web-based tool which helps to annotate video and images for Computer Vision algorithms. It was inspired by Vatic free, online, interactive video annotation tool. CVAT has many powerful features: interpolation of bounding boxes between key frames, automatic annotation using TensorFlow OD API, shortcuts for most of critical actions, dashboard with a list of annotation tasks, LDAP and basic authorization, etc... It was created for and used by a professional data annotation team. UX and UI were optimized especially for computer vision tasks developed by our team.
Getting started
Authorization
-
First of all you have to log in to CVAT tool.


-
If you don't have an account you have to create it using the link below the login page.

Administration panel
Type /admin in URL to go to the administration panel.
There you can:
- Create / edit / delete users
- Control user's permission and access to the tool.
Creating an annotation task
-
Create an annotation task by pressing
Create New Taskbutton on the main page.
-
Specify mandatory parameters of the task. You have to fill
Name,Labelsand pressSelect Filesat least.
Labels. Use the following schema to create labels:
label_name <prefix>input_type=attribute_name:attribute_value1,attribute_value2. You can specify multiple labels and multiple attributes separated by space. Attributes belong to previous label.Example:
vehicle @select=type:__undefined__,car,truck,bus,train ~radio=quality:good,bad ~checkbox=parked:false- one label with multiple attributescar person bike- three labels without attributescircle @radio=color:green,red,blue @number=radius:0,10,0.1 line square- one label with two attributes and two labels without attributes
label_name: for example vehicle, person, face etc.<prefix>:- Use
@for unique attributes which cannot be changed from frame to frame (e.g. age, gender, color, etc) - Use
~for temporary attributes which can be changed on any frame (e.g. quality, pose, truncated, etc)
input_type: the following input types are availableselect,checkbox,radio,number,text.attribute_name: for example age, quality, parkedattribute_value: for example middle-age, good, trueDefault value for an attribute is the first value after "
:".For
selectandradioinput types the special value is available:__undefined__. Specify this value first if an attribute should be annotated explicitly.Bug Tracker. Specify full URL your bug tracker if you have it.
Source. To create huge tasks please use
sharedserver directory (chooseShareoption in the dialog).Flip images. All selected files will be turned around 180.
Z-Order. Defines the order on drawn polygons. Check the box for enable layered dislaying.
Overlap Size. Use this option to make overlapped segments. The option makes tracks continuous from one segment into another. Use it for interpolation mode. There are several use cases for the parameter:
- For an interpolation task (video sequence) if an object exists on overlapped segments it will be automatically merged into one track if overlap is greater than zero and annotation is good enough on adjacent segments. If overlap equals to zero or annotation is poor on adjacent segments inside a dumped annotation file you will have several tracks, one for each segment, which correspond to the object).
- For an annotation task (independent images) if an object exists on overlapped segments bounding boxes will be automatically merged into one if overlap is greater than zero and annotation is good enough on adjacent segments. If overlap equals to zero or annotation is poor on adjacent segments inside a dumped annotation file you will have several bounding boxes for the same object.
Thus you annotate an object on first segment. You annotate the same object on second segment and if you do it right you will have one track inside your annotation file. If annotations on different segments (on overlapped frames) are very different or overlap is zero you will have two tracks for the same object. The functionality only works for bounding boxes. Polygon, polyline, points don't support automatic merge on overlapped segments even the overlap parameter isn't zero and match between corresponding shapes on adjacent segments is perfect.
Segment size. Use this option to divide huge dataset by a few less size segments.
Image Quality. Use this option to specify quality of uploaded images. The option makes it faster to load high-quality datasets. Use the value from
1(completely compressed images) to95(almost not compressed images).Push
Submitbutton and it will be added into the list of annotation tasks. Finally you should see something similar to the figure below:
-
Follow a link inside
Jobssection to start annotation process. In some cases you can have several links. It depends on size of your task andOverlap SizeandSegment Sizeparameters. To improve UX only several first frames will be loaded and you will be able to annotate first images. Other frames will be loaded in background.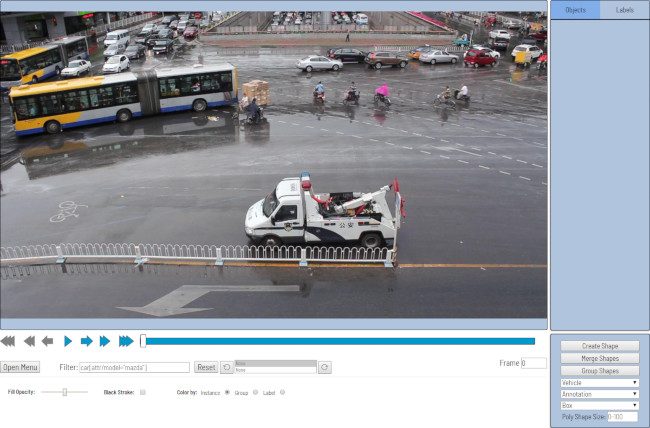
Basic navigation
-
Use arrows below to move on next/previous frame. Mostly every button is covered by a shortcut. To get a hint about the shortcut just put your mouse pointer over an UI element.

-
An image can be zoom in/out using mouse's wheel. The image will be zoomed relatively your current cursor position. Thus if you point on an object it will be under your mouse during zooming process.
-
An image can be moved/shifted by holding left mouse button inside some area without annotated objects. If
Shiftkey is pressed then all annotated objects are ignored otherwise a highlighted bounding box will be moved instead of the image itself. Usually the functionality is used together with zoom to precisely locate an object of interest.
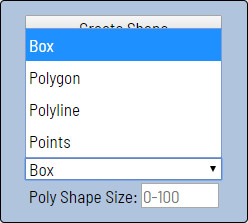
Types of Shapes (basic)
There are four shapes you can annotate your images with:
boxpolygonpolylinepoints
And here how they all look like:


Annotation mode (basics)
Usage examples:
- Create new annotations for a set of images.
- Add/modify/delete objects for existing annotations.
-
Before start need to check that
Annotationis selected: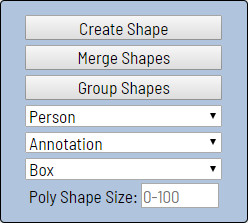
-
Create a new annotation:
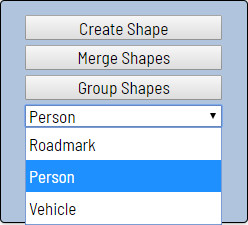
- Choose right
Shape(e.g. box) andLabel(was specified by you while creating the task) beforehand:
- Create a bounding box by clicking on
Create Shapebutton orNshortcut. Choose opposite points. Your first bounding box is ready!

- It is possible to adjust boundaries and location of the bounding box using mouse. In the top right corner size of the box is shown. You can also undo/redo your actions by using
Ctrl+Z/Shift+Ctrl+Z Ctrl+Y.
- Choose right
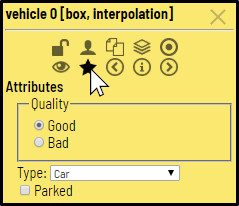
-
In the list of objects you can see the labeled car. In the side panel you can perform basic operations under the object.

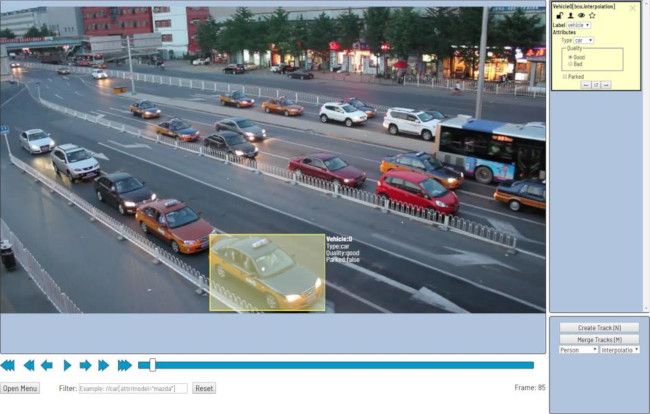
-
An example of fully annotated frame in
Annotationmode can look like on the figure below.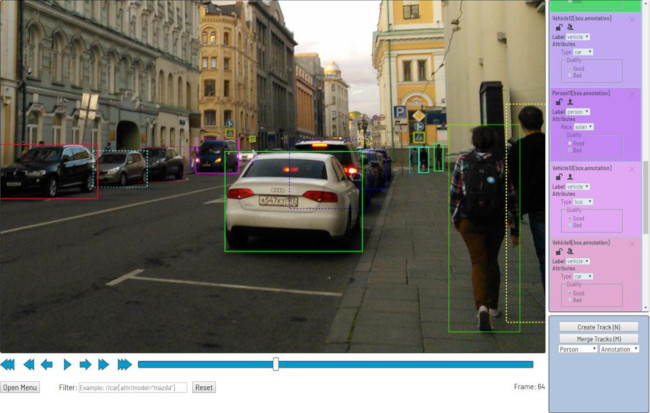
Interpolation mode (basics)
Usage examples:
- Create new annotations for a sequence of frames.
- Add/modify/delete objects for existing annotations.
- Edit tracks, merge many bounding boxes into one track.
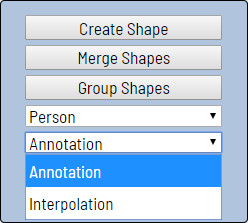
-
Before start need to be sure that
Interpolationis selected.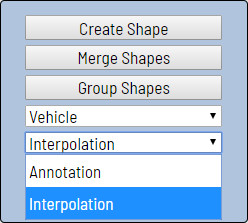
-
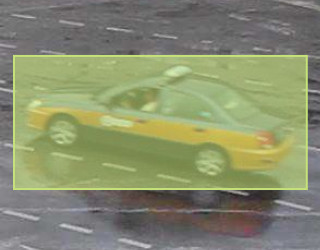
Create a track for an object (look at the selected car as an example):
-
Annotate a bounding box on first frame for the object.
-
In
Interpolationmode the bounding box will be interpolated on next frames automatically.
-
-
If the object starts to change its position you need to modify bounding boxes where it happens. Changing of bounding boxes on each frame isn't necessary. It is enough to update several key frames and frames between them will be interpolated automatically. See an example below:
-
When the annotated object disappears or becomes too small, you need to finish the track. To do that you need to choose
Outside Property.
-
If the object isn't visible on a couple of frames and after that it appears again it is possible to use
Merge Tracksfunctionality to merge several separated tracks into one.
-
Let's create a track for the bus.

-
After that create a track when it appears again on the sequence of frames.
-
Press
Merge Tracksbutton and click on any bounding box of first track and on any bounding box of second track.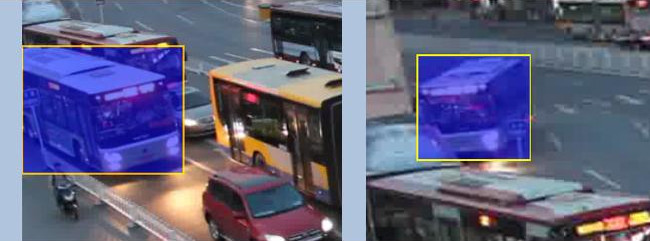
-
Press
Apply Mergebutton to apply changes.
-
The final annotated sequence of frames in
Interpolationmode can look like the clip below:
-

Attribute Annotation mode (basics)
-
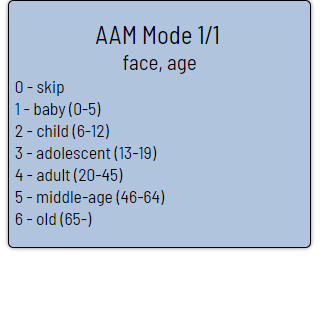
In this Mode you can edit attributes with fast navigation between objects and frames using keyboard. Press
Shift+Entershortcut to enter AAMode. After that it is possible to change attributes using keyboard.
-
The active attribute will be red. In this case it is
Gender. Look at the bottom side panel to see all possible shortcuts to change the attribute. Press2key on your keyboard to assignfemalevalue for the attribute.

-
Press
Up Arrow/Down Arrowkeys on your keyboard to go to next attribute. In this case after pressingDown Arrowyou will be able to editAgeattribute.
-
Use
Right Arrow/Left Arrowkeys to move on previous/next image with annotation.
Downloading annotations
-
To download latest annotations save all changes first. Press
Open Menuand thenSave Workbutton. There isCtrl+sshortcut to save annotations quickly. -
After that press
Open Menuand thenDump Annotationbutton.
-
The annotation will be written into .xml file. To find the annotation file go to the directory where your browser saves downloaded files by default. For more information visit .xml format page.

Vocabulary
Bounding box is an area which defines boundaries of an object. To specify it you need to define top left and bottom right points.
Tight bounding box is a bounding box where margin between the object inside and boundaries of the box is absent. By default the type of bounding box is used in most tasks but precision completely depends on an annotation task.
| Bounding box | Tight bounding box |
|---|---|
 |
 |
Label is a type of an annotated object (e.g. person, car, face, etc.)

Attribute is a property of an annotated object (e.g. color, model, quality, etc.). There are two types of attributes:
-
Unique: immutable and isn't changed from frame to frame (e.g age, gender, color, etc.)

-
Temporary: mutable and can be changed on any frame (e.g. quality, pose, truncated, etc.)

Track is a set of shapes on different frames which corresponds to one object. Tracks are created in Interpolation mode mode.

Annotation is a set of shapes and tracks. There are several types of annotations:
- Manual which is created by a person
- Semi-automatic which is created mainly automatically but the user provides some data (e.g. interpolation)
- Automatic which is created automatically without a person in the loop
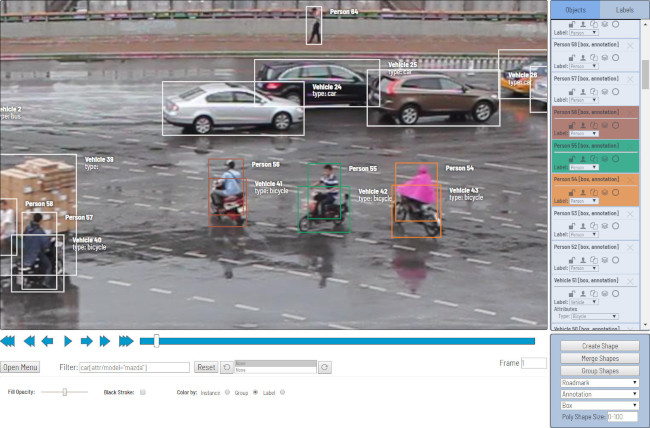
Interface of the annotation tool
The tool is composed of:
Workspace— where images are shown;Bottom panel(under workspace) — for navigation, filtering annotation and accessing tools' menu;Side Panel— contain two lists: of Objects (on the frame) and Labels (of Objects on the frame);Bottom Side Panel— for choosing types of/creating/merging/grouping annotation;

There are also:
-
Settings(F2) — contains different parameters which can be adjusted by the user needs -
Context menu— click right mouse button inside of a shape or at a point (only in poly-shapes)


Settings
Click F2 to access settings menu.
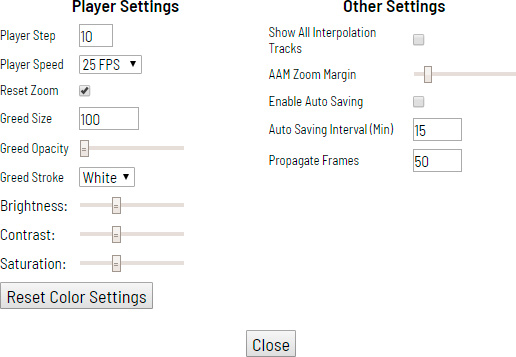
There is Player Settings which adjusting Workspace and Other Settings.
In Player Settings you can:
-
Control step of
CandVshortcuts -
Control speed of
Space/Play button -
Show every image in full or zoomed out like previous (reset by default)
-
Enable
Gridwhen you don't need too small annotation.Gridcan have different opacity, color and cells' size — useF2to tune settings.
-
Adjust
Brightness/Contrast/Saturationof too expose or too dark images usingF2— color settings (changes displaying and not the image itself). Shortcuts:-
Shift+B/Alt+Bfor brightness -
Shift+C/Alt+Cfor contrast -
Shift+S/Alt+Sfor saturation -
F2—>Reset Color Settingsfor default image
-
Other Settings contain:
Show All Interpolation Trackscheckbox — shows hidden object on side panel for every interpolated object (turned off by default)AAM Zoom Marginslider — defines margins for shape in attribute annotation modeEnable AutoSavingcheckbox — turned off by defaultAutoSaving Interval (Min)input box — 15 minutes by defaultPropagate Framesinput box — allow to choose on how many frames selected object will be copied in byCtrl+B(50 by default)
Bottom Panel

Go to the first and latest frames.
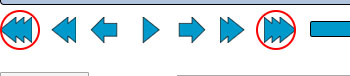
Go to the next/previous frame with a predefined step. Shortcuts: v — step backward, c — step forward. By default the step is 10 (change at Open Menu —> Settings —> Player Step).
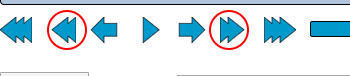
Go to the next/previous frame with step equals to 1. Shortcuts: d — previous, f — next.

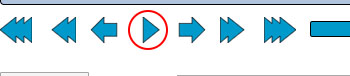
Play the sequence of frames or the set of images. Shortcut: Space (change at Open Menu —> Settings —> Player Speed).
Go to specified frame. Press ~ to highlight element.

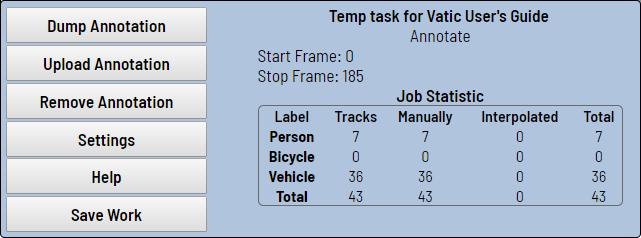
Open Menu button
It is the main menu for the annotation tool. It can be used to download, upload and remove annotations. As well it shows statistics about the current annotation task.
Filter input box
How to use filters is described in the Advanced guide (below).

History / Undo-Redo panel
Use shortcuts for undo/redo actions Ctrl+Z / Ctrl+Shift+Z/Ctrl+Y

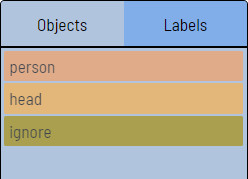
Side panel
Objects
In the Side Panel you can see the list of available objects on the current frame. An example how the list can look like below:
| Annotation mode | Interpolation mode |
|---|---|
 |
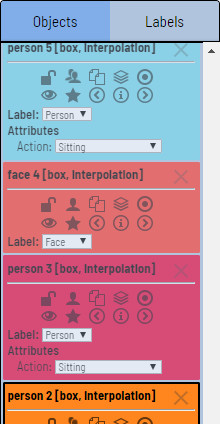 |
Labels
You also can see all labels that used on this frame and highlight them by clicking needed label.
Objects' card
A shape can be removed. Shortcut: Delete. A locked shape can be deleted using Shift+Delete shortcut.

A shape can be locked to prevent its modification or moving by an accident. Shortcut to lock an object: l.
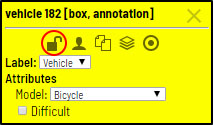
A shape can be Occluded. Shortcut: q. Such shapes have dashed boundaries.


You can copy and paste this object on this or other frame. Ctrl+C/Ctrl+V shortcuts works under mouse point.
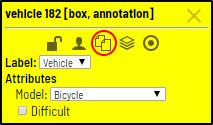
You can propagate this object on next X frames. Ctrl+B shortcut works under mouse point. F2 for change on how many frames to propagate this object.

You can change how this objects' annotation is displayed on this frame. It could be Hide, Shows Only Box, Shows Box and Title. H is for this object, T+H for all objects on this frame.

The type of a shape can be changed by selecting Label property. For instance, it can look like on the figure below:
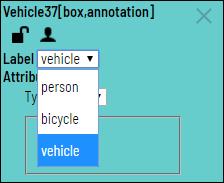
To change a type of a highlighted shape using keyboard you need to press Shift+<number>.
Bottom side panel
Create Shape(N) — start/stop draw new shape modeMerge Shapes(M) — start/stop merge boxes modeGroup Shapes(G) — start/stop grouping boxes modeLabel Type— (e.g. Face, Person, Vehicle)Working Mode— Annotation or Interpolation modes. You can't interpolate Polygons/Polylines/Points, but you can propagate them usingCtrl+Bor merge into a trackShape type— (e.g. Box, Polygon, Polyline, Points)Poly Shape Size— (optional) hard number of dots for creating Polygon/Polyline shapes
Fullscreen player mode
Go to Open Menu —> Fullscreen Player
Exit with F11 or Ecs.
That is how it looks like.

Annotation mode (advanced)
Basic operations in the mode was described above.
occluded attribute is used if an object is occluded by another object or it isn't fully visible on the frame. Use Q shortcut to set the property quickly.

Example: both cars on the figure below should be labeled as occluded.

If a frame contains too many objects and it is difficult to annotate them due to many shapes are placed mostly in the same place when it makes sense to lock them. Shapes for locked objects are transparent and it is easy to annotate new objects. Also it will not be possible to change previously annotated objects by an accident. Shortcut: L.

Interpolation mode (advanced)
Basic operations in the mode was described above.
Bounding boxes created in the mode have extra navigation buttons.
-
These buttons help to jump to previous/next key frame.

-
The button helps to jump to initial frame for the object (first bounding box for the track).

Attribute Annotation mode (advanced)
Basic operations in the mode was described above.
It is possible to handle many objects on the same frame in the mode.

It is more convenient to annotate objects of the same type. For the purpose
it is possible to specify a corresponding filter. For example, the following
filter will hide all objects except pedestrians: pedestrian.
To navigate between objects (pedestrians in the case) use the following shortcuts:
Tab— go to the next objectShift+Tab— go to the previous object.
By default in the mode objects are zoomed in to full screen. Check
Open Menu —> Settings —> AAM Zoom Margin for adjust that.
Annotation with polygons
It is used for semantic / instance segmentation.
Be sure Z-Order flag in Create task dialog is enabled if you want annotate polygons. Z-Order flag defines order of drawing. It is necessary to get right annotation mask without extra work (additional drawing of borders). Z-order can be changed by +/- which set maximum/minimum z-order respectively.

Before start need to be sure that Polygon is selected.
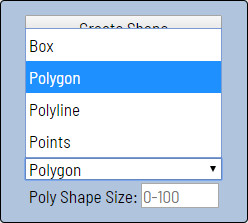
Click N for entering drawing mode. Now you can start your polygon.
You can zoom in/out (on mouse wheel scroll) and move (on mouse wheel press
and mouse move) while drawing. Click N again for completing the shape.
Also you can set fixed number of points in the field "Poly Shape Size", then
drawing will be stopped automatically. You can drag object after it was drawn
and fix a position of an individual points after finishing the object. You
can add/delete points after finishing.
Below you can see results with opacity and black stroke:
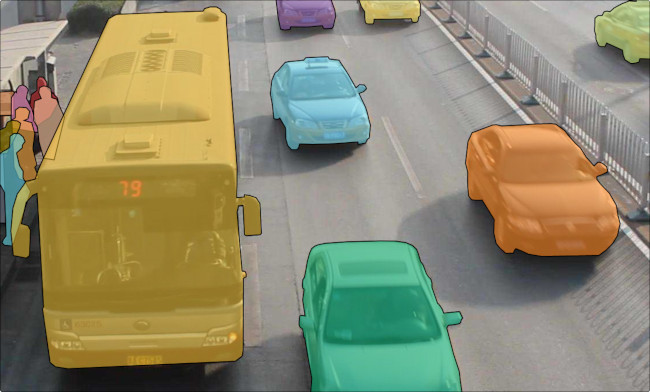
Also if you need annotate small objects, increase Image Quality to 95 in Create task dialog for annotators convenience.
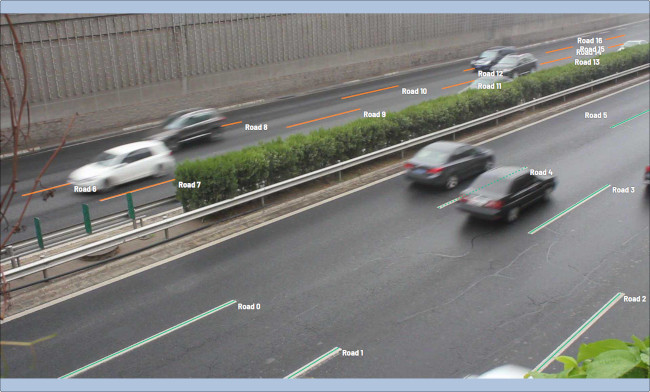
Annotation with polylines
It is used for road markup annotation etc.
Before start need to be sure that Polyline is selected.

Click N for entering drawing mode. Now you can start your polyline.
You can zoom in/out (on mouse wheel scroll) and move (on mouse wheel press and
mouse move) while drawing. Click N again for completing the shape. Also
you can set fixed number of points in the field "Poly Shape Size", then drawing
will be stopped automatically. You can drag object after it was drawn and fix
a position of an individual points after finishing the object. You can
add/delete points after finishing.
Annotation with points
It is used for face landmarks annotation etc.
Before start need to be sure that Points is selected.

Click N for entering drawing mode. Now you can start marking a needed area.
Click N again for finishing marking an area. Also you can set fixed number
of points in the field "Poly Shape Size", then drawing will be stopped
automatically. Points are automatically grouped — between individual start
and finish all points will be considered linked. You can zoom in/out (on mouse
wheel scroll) and move (on mouse wheel press and mouse move) while drawing.
You can drag object after it was drawn and fix a position of an individual
points after finishing the object. You can add/delete points after finishing.

Shape grouping
This feature allows to group several shapes.
You may use Group Shapes button or shortcuts:
G— switch group modeAlt+G— close group modeShift+G— reset group for selected shapes
You may select shapes by click or by area selection.
Grouped shapes will have group_id filed in dumped annotation.
Also you may switch color distribution from by instance (default) to by group. For it need switch Color By Group checkbox.
Shapes which haven't group_id will be highlighted with white color.

Filter

There are several reasons to use the feature:
- When use a filter objects which don't correspond to the filter will be hidden.
- Fast navigation between frames which have an object of interest. Use
Left Arrow/Right Arrowkeys for the purpose. If the filter is empty the mentioned arrows will go to previous/next frames which contain any objects.
To use the functionality it is enough to specify a value inside Filter text box and defocus the text box (for example, click on the image). After that the filter will be applied.
In a trivial case a correct filter should correspond to the template: label[prop operator "value"]
label is a type of an object (e.g person, car, face, etc.). If the type isn't important you can use *.
prop is a property which should be filtered. The following items are available:
id— identifier of an object. It helps to find a specific object easily in case of huge number of objects and images/frames.type— an annotation type. Possible values:annotationinterpolation
lockacceptstrueandfalsevalues. It can be used to hide all locked objects.occludedacceptstrueandfalsevalues. It can be used to hide all occluded objects.attris a prefix to access attributes of an object. For example, it is possible to access race attribute. For the purpose you should specifyattr/race. To access all attributes it is necessary to writeattr/*.
operator can be = (equal), != (not equal), < (less), > (more), <= (less or equal), >= (more or equal).
"value" — value of an attribute or a property. It has to be specified in quotes.
| Example | Description |
|---|---|
face |
all faces |
*[id=4] |
object with id #4 |
*[type="annotation"] |
annotation objects only |
car[occluded="true"] |
cars with occluded property |
*[lock!="true"] |
all unlocked objects |
car[attr/parked="true"] |
parked cars |
*[attr/*="__undefined__"] |
any objects with __undefined__ value of an attribute |
The functionality allows to create more complex conditions. Several filters can be combined by or, and, | operators. Operators or, and can be applied inside square brackets. | operator (union) can be applied outside of square brackets.
| Example | Description |
|---|---|
person[attr/age>="25" and attr/age<="35"] |
people with age between 25 and 35. |
face[attr/glass="sunglass" or attr/glass="no"] |
faces with sunglasses or without glasses at all. |
| ```person[attr/race="asian"] | car[attr/model="bmw" or attr/model="mazda"]``` |
Shortcuts
Many UI elements have shortcut hints. Put your pointer to an interesting element to see it.

| Shortcut | Common |
|---|---|
F1 |
open help |
F1 in dashboard |
open page with documentation |
F2 |
open settings |
L |
lock/unlock an active shape |
L+T |
lock/unlock all shapes on the current frame |
Q or Num/ |
set occluded property for an active shape |
N |
start/stop draw mode |
Alt+N |
close draw mode without create |
Ctrl+<number> |
change type of an active shape |
Shift+<number> |
change type of new shape by default |
Enter |
change color of active shape |
H |
hide active shape |
T+H |
hide all shapes |
J |
hide labels with attributes on every frame |
Delete |
delete an active shape |
Shift+Delete |
delete an active shape even if it is locked |
F |
go to next frame |
D |
go to previous frame |
V |
go forward with a predefined step |
C |
go backward with a predefined step |
~ |
focus to go to frame element |
Ctrl+C |
copy an active shape |
Ctrl+V |
insert a copied shape |
Ctrl+Z |
undo previous action |
Ctrl+Shift+Z/Ctrl+Y |
redo previous action |
Shift+B/Alt+B |
increase/decrease brightness on an image |
Shift+C/Alt+C |
increase/decrease contrast on an image |
Shift+S/Alt+S |
increase/decrease saturation on an image |
Ctrl+S |
save job |
Ctrl+B |
propagate active shape |
+/- |
change relative order of highlighted polygon |
| Interpolation | |
M |
enter/apply merge mode |
Alt+M |
close merge mode without apply the merge |
R |
go to the next key frame of an active shape |
E |
go to the previous key frame of an active shape |
| Attribute annotation mode | |
Shift+Enter |
enter/leave Attribute Annotation mode |
Up Arrow |
go to the next attribute (up) |
Down Arrown |
go to the next attribute (down) |
Tab |
go to the next annotated object |
Shift+Tab |
go to the previous annotated object |
<number> |
assign a corresponding value to the current attribute |
| Grouping | |
G |
switch group mode |
Alt+G |
close group mode |
Shift+G |
reset group for selected shapes |
| Filter | |
Left Arrow |
go to the previous frame which corresponds to the specified filter value |
Right Arrow |
go to the next frame which corresponds to the specified filter value |
Hints
Hold Mouse Wheel in order to move frame (for example during drawing)
Hold Ctrl when shape is active and fix it.
Hold Ctrl when paste shape from buffer for multiple pasting.