68 KiB
- User's guide
- Getting started
- Interface of the annotation tool
- Shape mode (advanced)
- Track mode (advanced)
- Attribute annotation mode (advanced)
- Annotation with rectangle by 4 points
- Annotation with polygons
- Annotation with polylines
- Annotation with points
- Annotation with cuboids
- Annotation with tags
- Automatic annotation
- Shape grouping
- Filter
- Analytics
- Shortcuts
- Hints
User's guide
Computer Vision Annotation Tool (CVAT) is a web-based tool which helps to annotate videos and images for Computer Vision algorithms. It was inspired by Vatic free, online, interactive video annotation tool. CVAT has many powerful features: interpolation of bounding boxes between key frames, automatic annotation using deep learning models, shortcuts for most of critical actions, dashboard with a list of annotation tasks, LDAP and basic authorization, etc... It was created for and used by a professional data annotation team. UX and UI were optimized especially for computer vision tasks developed by our team.
Getting started
Authorization
-
First of all, you have to log in to CVAT tool.

-
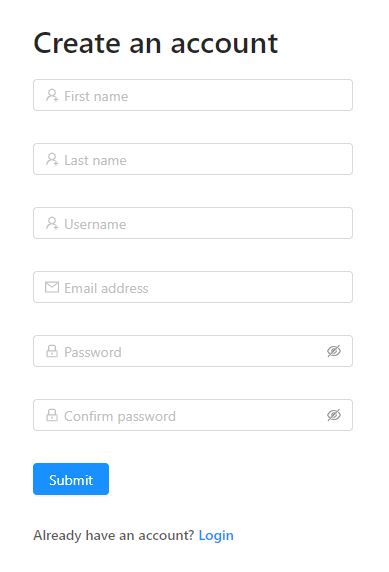
For register a new user press "Create an account"

-
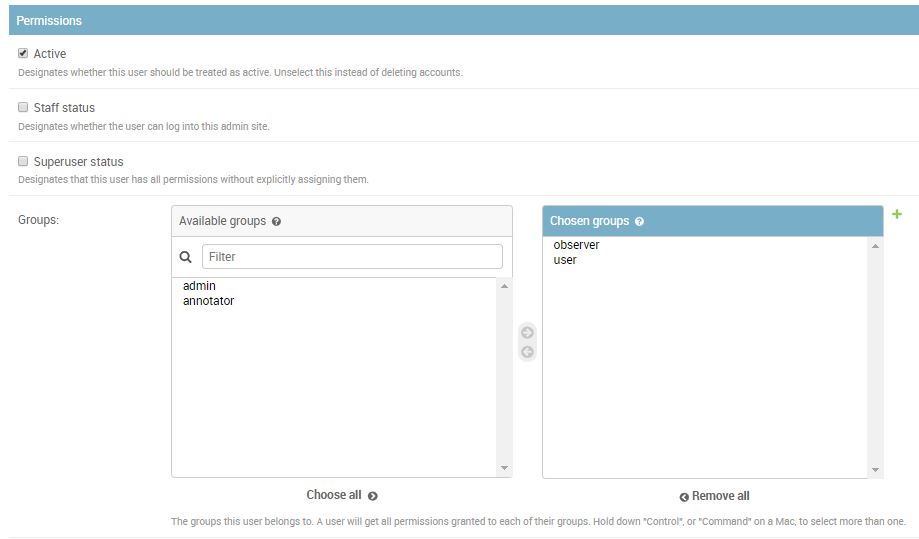
You can register a user but by default it will not have rights even to view list of tasks. Thus you should create a superuser. The superuser can use Django administration panel to assign correct groups to the user. Please use the command below to create an admin account:
docker exec -it cvat bash -ic '/usr/bin/python3 ~/manage.py createsuperuser' -
If you want to create a non-admin account, you can do that using the link below on the login page. Don't forget to modify permissions for the new user in the administration panel. There are several groups (aka roles): admin, user, annotator, observer.
Administration panel
Go to the Django administration panel. There you can:
-
Create / edit / delete users
-
Control permissions of users and access to the tool.
Creating an annotation task
-
Create an annotation task pressing
Create new taskbutton on the main page.
-
Specify parameters of the task:
Basic configuration
Name The name of the task to be created.

Labels. There are two ways of working with labels:
-
The
Constructoris a simple way to add and adjust labels. To add a new label click theAdd labelbutton.
You can set a name of the label in the
Label namefield.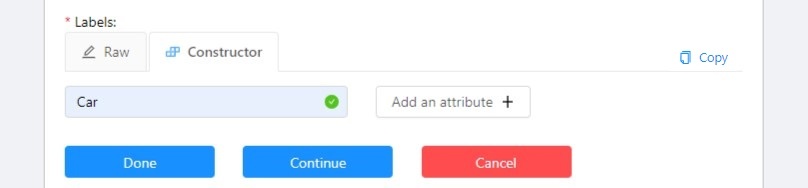
If necessary you can add an attribute and set its properties by clicking
Add an attribute: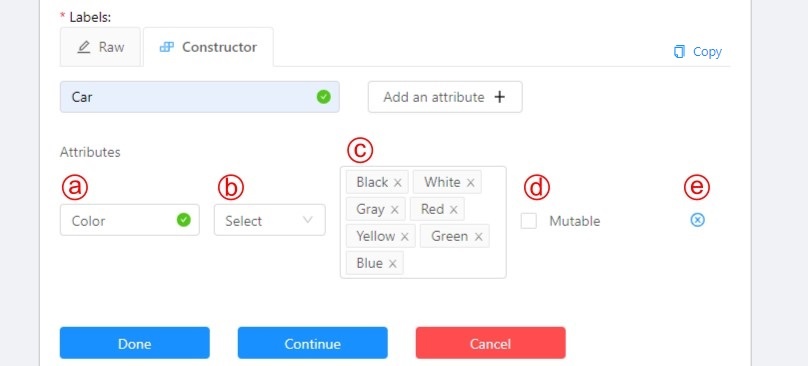
The following actions are available here:
- Set the attribute’s name.
- Choose the way to display the attribute:
- Select — drop down list of value
- Radio — is used when it is necessary to choose just one option out of few suggested.
- Checkbox — is used when it is necessary to choose any number of options out of suggested.
- Text — is used when an attribute is entered as a text.
- Number — is used when an attribute is entered as a number.
- Set values for the attribute. The values could be separated by pressing
Enter. The entered value is displayed as a separate element which could be deleted by pressingBackspaceor clicking the close button (x). If the specified way of displaying the attribute is Text or Number, the entered value will be displayed as text by default (e.g. you can specify the text format). - Checkbox
Mutabledetermines if an attribute would be changed frame to frame. - You can delete the attribute by clicking the close button (x).
Click the
Continuebutton to add more labels. If you need to cancel adding a label - press theCancelbutton. After all the necessary labels are added click theDonebutton. After clickingDonethe added labels would be displayed as separate elements of different colour. You can edit or delete labels by clickingUpdate attributesorDelete label. -
The
Rawis a way of working with labels for an advanced user. Raw presents label data in json format with an option of editing and copying labels as a text. TheDonebutton applies the changes and theResetbutton cancels the changes.
In
RawandConstructormode, you can press theCopybutton to copy the list of labels.Select files. Press tab
My computerto choose some files for annotation from your PC. If you select tabConnected file shareyou can choose files for annotation from your network. If you selectRemote source, you'll see a field where you can enter a list of URLs (one URL per line).
Advanced configuration

Z-Order. Defines the order on drawn polygons. Check the box for enable layered displaying.
Use zip chunks. Force to use zip chunks as compressed data. Actual for videos only.
Image Quality. Use this option to specify quality of uploaded images. The option helps to load high resolution datasets faster. Use the value from
1(completely compressed images) to95(almost not compressed images).Overlap Size. Use this option to make overlapped segments. The option makes tracks continuous from one segment into another. Use it for interpolation mode. There are several options for using the parameter:
- For an interpolation task (video sequence). If you annotate a bounding box on two adjacent segments they will be merged into one bounding box. If overlap equals to zero or annotation is poor on adjacent segments inside a dumped annotation file, you will have several tracks, one for each segment, which corresponds to the object.
- For an annotation task (independent images). If an object exists on overlapped segments, the overlap is greater than zero and the annotation is good enough on adjacent segments, it will be automatically merged into one object. If overlap equals to zero or annotation is poor on adjacent segments inside a dumped annotation file, you will have several bounding boxes for the same object. Thus, you annotate an object on the first segment. You annotate the same object on second segment, and if you do it right, you will have one track inside the annotations. If annotations on different segments (on overlapped frames) are very different, you will have two shapes for the same object. This functionality works only for bounding boxes. Polygons, polylines, points don't support automatic merge on overlapped segments even the overlap parameter isn't zero and match between corresponding shapes on adjacent segments is perfect.
Segment size. Use this option to divide a huge dataset into a few smaller segments. For example, one job cannot be annotated by several labelers (it isn't supported). Thus using "segment size" you can create several jobs for the same annotation task. It will help you to parallel data annotation process.
Start frame. Frame from which video in task begins.
Stop frame. Frame on which video in task ends.
Frame Step. Use this option to filter video frames. For example, enter
25to leave every twenty fifth frame in the video or every twenty fifth image.Chunk size. Defines a number of frames to be packed in a chunk when send from client to server. Server defines automatically if empty.
Recommended values:
- 1080p or less: 36
- 2k or less: 8 - 16
- 4k or less: 4 - 8
- More: 1 - 4
Dataset Repository. URL link of the repository optionally specifies the path to the repository for storage (
default: annotation / <dump_file_name> .zip). The .zip and .xml file extension of annotation are supported. Field format:URL [PATH]example:https://github.com/project/repos.git [1/2/3/4/annotation.xml]Supported URL formats :
https://github.com/project/repos[.git]github.com/project/repos[.git]git@github.com:project/repos[.git]
The task will be highlighted in red after creation if annotation isn't synchronized with the repository.
Use LFS. If the annotation file is large, you can create a repository with LFS support.
Issue tracker. Specify full issue tracker's URL if it's necessary.
Push
Submitbutton and it will be added into the list of annotation tasks. Then, the created task will be displayed on a dashboard:
-
-
The Dashboard contains elements and each of them relates to a separate task. They are sorted in creation order. Each element contains: task name, preview, progress bar, button
Open, and menuActions. Each button is responsible for a in menuActionsspecific function:Dump AnnotationandExport as a dataset— download annotations or annotations and images in a specific format. The following formats are available:- CVAT for video is highlighted if a task has the interpolation mode.
- CVAT for images is highlighted if a task has the annotation mode.
- PASCAL VOC
- (VOC) Segmentation mask — archive contains class and instance masks for each frame in the png format and a text file with the value of each color.
- YOLO
- COCO
- TFRecord
- MOT
- LabelMe 3.0
- Datumaro
Upload annotationis available in the same formats as inDump annotation.- CVAT accepts both video and image sub-formats.
Automatic Annotation— automatic annotation with OpenVINO toolkit. Presence depends on how you build CVAT instance.Open bug tracker— opens a link to Issue tracker.Delete— delete task.
Push
Openbutton to go to task details. -
Task details is a task page which contains a preview, a progress bar and the details of the task (specified when the task was created) and the jobs section.

- The next actions are available on this page:
- Change the task’s title.
- Open
Actionsmenu. - Change issue tracker or open issue tracker if it is specified.
- Change labels.
You can add new labels or add attributes for the existing labels in the Raw mode or the Constructor mode.
By clicking
Copyyou will copy the labels to the clipboard. - Assigned to — is used to assign a task to a person. Start typing an assignee’s name and/or choose the right person out of the dropdown list.
Jobs— is a list of all jobs for a particular task. Here you can find the next data:- Jobs name with a hyperlink to it.
- Frames — the frame interval.
- A status of the job. The status is specified by the user in the menu inside the job. There are three types of status: annotation, validation or completed. The status of the job is changes the progress bar of the task.
- Started on — start date of this job.
- Duration — is the amount of time the job is being worked.
- Assignee is the user who is working on the job. You can start typing an assignee’s name and/or choose the right person out of the dropdown list.
Copy. By clicking Copy you will copy the job list to the clipboard. The job list contains direct links to jobs.
- The next actions are available on this page:
-
Follow a link inside
Jobssection to start annotation process. In some cases, you can have several links. It depends on size of your task andOverlap SizeandSegment Sizeparameters. To improve UX, only the first chunk of several frames will be loaded and you will be able to annotate first images. Other frames will be loaded in background.
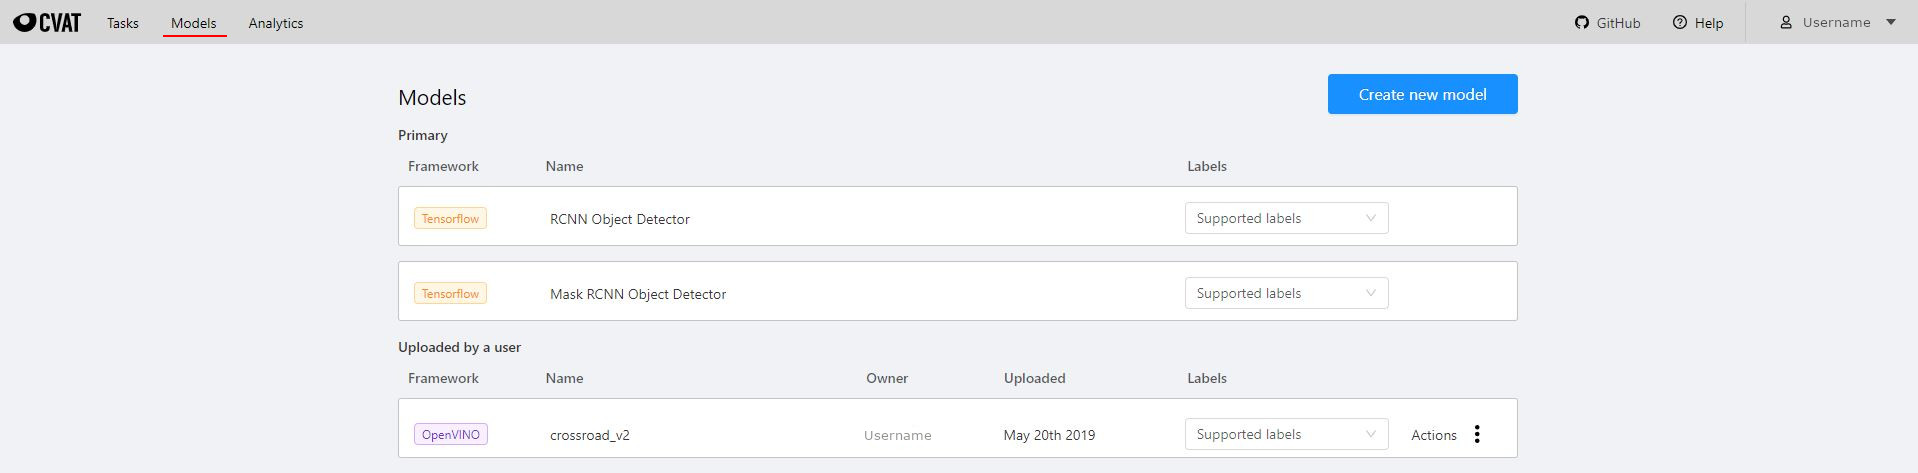
Models
On the Models page allows you to manage your deep learning (DL) models uploaded for auto annotation.
Using the functionality you can upload, update or delete a specific DL model.
To open the model manager, click the Models button on the navigation bar.
The Models page contains information about all the existing models. The list of models is divided into two sections:
- Primary — contains default CVAT models. Each model is a separate element.
It contains the model’s name, a framework on which the model was based on and
Supported labels(a dropdown list of all supported labels). - Uploaded by a user — Contains models uploaded by a user.
The list of user models has additional columns with the following information:
name of the user who uploaded the model and the upload date.
Here you can delete models in the
Actionsmenu.
In order to add your model, click Create new model.
Enter model name, and select model file using "Select files" button.
To annotate a task with a custom model you need to prepare 4 files:
Model config(*.xml) - a text file with network configuration.Model weights(*.bin) - a binary file with trained weights.Label map(*.json) - a simple json file with label_map dictionary like an object with string values for label numbers.Interpretation script(*.py) - a file used to convert net output layer to a predefined structure which can be processed by CVAT.
You can learn more about creating model files by pressing (?).
Check the box Load globally if you want everyone to be able to use the model.
Click the Submit button to submit a model.

After the upload is complete your model can be found in the Uploaded by a user section.
Use "Auto annotation" button to pre annotate a task using one of your DL models.
Read more
Search
There are several options how to use the search.
- Search within all fields (owner, assignee, task name, task status, task mode). To execute enter a search string in search field.
- Search for specific fields. How to perform:
owner: admin- all tasks created by the user who has the substring "admin" in his nameassignee: employee- all tasks which are assigned to a user who has the substring "employee" in his namename: mighty- all tasks with the substring "mighty" in their namesmode: annotationormode: interpolation- all tasks with images or videos.status: annotationorstatus: validationorstatus: completed- search by statusid: 5- task with id = 5.
- Multiple filters. Filters can be combined (except for the identifier) using the keyword
AND:mode: interpolation AND owner: adminmode: annotation and status: annotation
The search is case insensitive.

Interface of the annotation tool
The tool consists of:
Header- pinned header used to navigate CVAT sections and account settings;Top panel— contains navigation buttons, main functions and menu access;Workspace— space where images are shown;Controls sidebar— contains tools for navigating the image, zoom, creating shapes and editing tracks (merge, split, group)Objects sidebar— contains label filter, two lists: objects (on the frame) and labels (of objects on the frame) and appearance settings.

Basic navigation
-
Use arrows below to move to the next/previous frame. Use the scroll bar slider to scroll through frames. Almost every button has a shortcut. To get a hint about a shortcut, just move your mouse pointer over an UI element.
-
To navigate the image, use the button on the controls sidebar. Another way an image can be moved/shifted is by holding the left mouse button inside an area without annotated objects. If the
Mouse Wheelis pressed, then all annotated objects are ignored. Otherwise the a highlighted bounding box will be moved instead of the image itself.
-
You can use the button on the sidebar controls to zoom on a region of interest. Use the button
Fit the imageto fit the image in the workspace. You can also use the mouse wheel to scale the image (the image will be zoomed relatively to your current cursor position).
Types of shapes (basics)
There are five shapes which you can annotate your images with:
RectangleorBounding boxPolygonPolylinePointsCuboidTag
And there is how they all look like:


Tag - has no shape in the workspace, but is displayed in objects sidebar.
Shape mode (basics)
Usage examples:
- Create new annotations for a set of images.
- Add/modify/delete objects for existing annotations.
-
You need to select
Rectangleon the controls sidebar:
Before you start, select the correct
Label(should be specified by you when creating the task) andDrawing Method(by 2 points or by 4 points):
-
Creating a new annotation in
Shape mode:-
Create a separate
Rectangleby clicking onShape.
-
Choose the opposite points. Your first rectangle is ready!
-
To learn about creating a rectangle using the by 4 point drawing method, (read here).
-
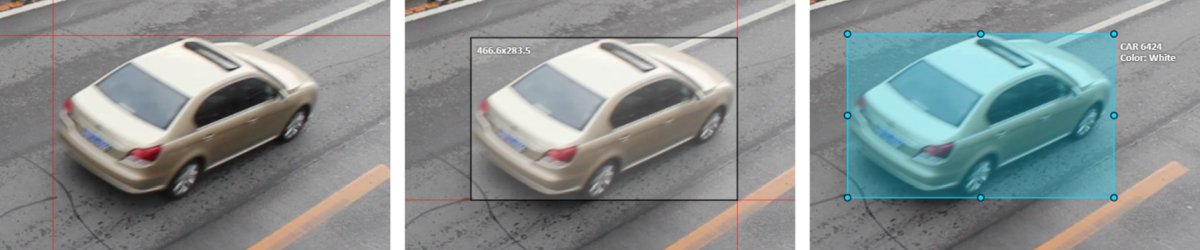
It is possible to adjust boundaries and location of the rectangle using a mouse. Rectangle's size is shown in the top right corner , you can check it by clicking on any point of the shape. You can also undo your actions using
Ctrl+Zand redo them withShift+Ctrl+ZorCtrl+Y.
-
-
You can see the
Object cardin the objects sidebar or open it by right-clicking on the object. You can change the attributes in the details section. You can perform basic operations or delete an object by clicking on the action menu button.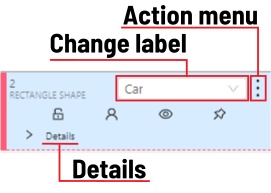
-
The following figure is an example of a fully annotated frame with separate shapes.

Read more in the section shape mode (advanced).
Track mode (basics)
Usage examples:
- Create new annotations for a sequence of frames.
- Add/modify/delete objects for existing annotations.
- Edit tracks, merge several rectangles into one track.
-
Like in the
Shape mode, you need to select aRectangleon the sidebar, in the appearing form, select the desiredLabeland theDrawing method.
-
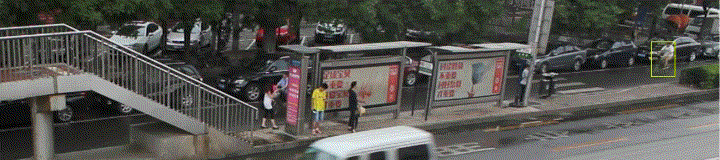
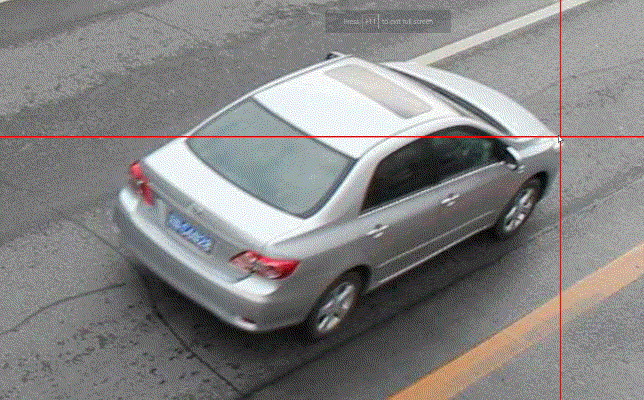
Creating a track for an object (look at the selected car as an example):
-
Create a
RectangleinTrack modeby clicking onTrack.
-
In
Track modethe rectangle will be automatically interpolated on the next frames. -
The cyclist starts moving on frame #2270. Let's mark the frame as a key frame. You can press
Kfor that or click thestarbutton (see the screenshot below).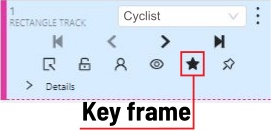
-
If the object starts to change its position, you need to modify the rectangle where it happens. It isn't necessary to change the rectangle on each frame, simply update several keyframes and the frames between them will be interpolated automatically.
-
Let's jump 30 frames forward and adjust the boundaries of the object. See an example below:

-
After that the rectangle of the object will be changed automatically on frames 2270 to 2300:

-
-
When the annotated object disappears or becomes too small, you need to finish the track. You have to choose
Outside Property, shortcutO.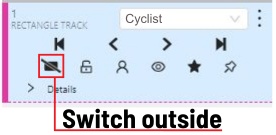
-
If the object isn't visible on a couple of frames and then appears again, you can use the
Mergefeature to merge several individual tracks into one.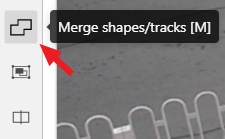
-
Create tracks for moments when the cyclist is visible:
-
Click
Mergebutton or press keyMand click on any rectangle of the first track and on any rectangle of the second track and so on: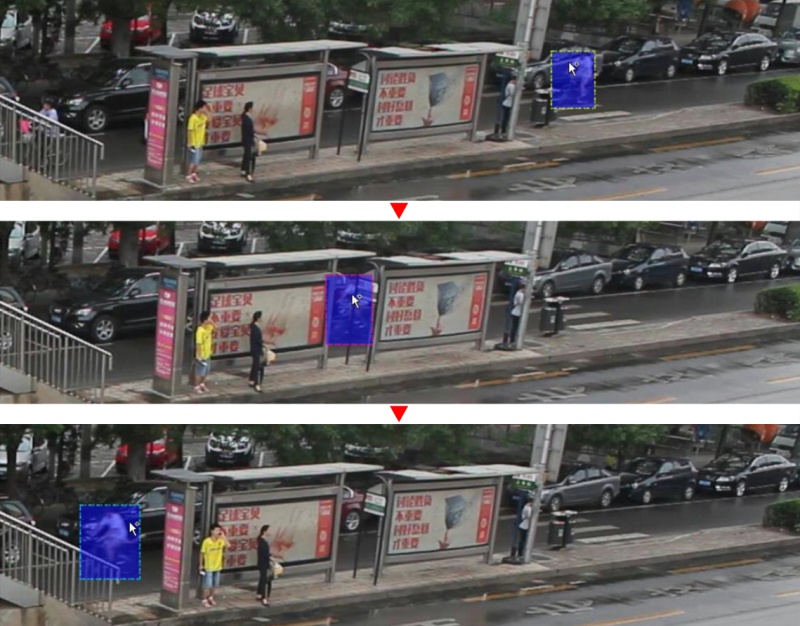
-
Click
Mergebutton or pressMto apply changes. -
The final annotated sequence of frames in
Interpolationmode can look like the clip below:
Read more in the section track mode (advanced).
-
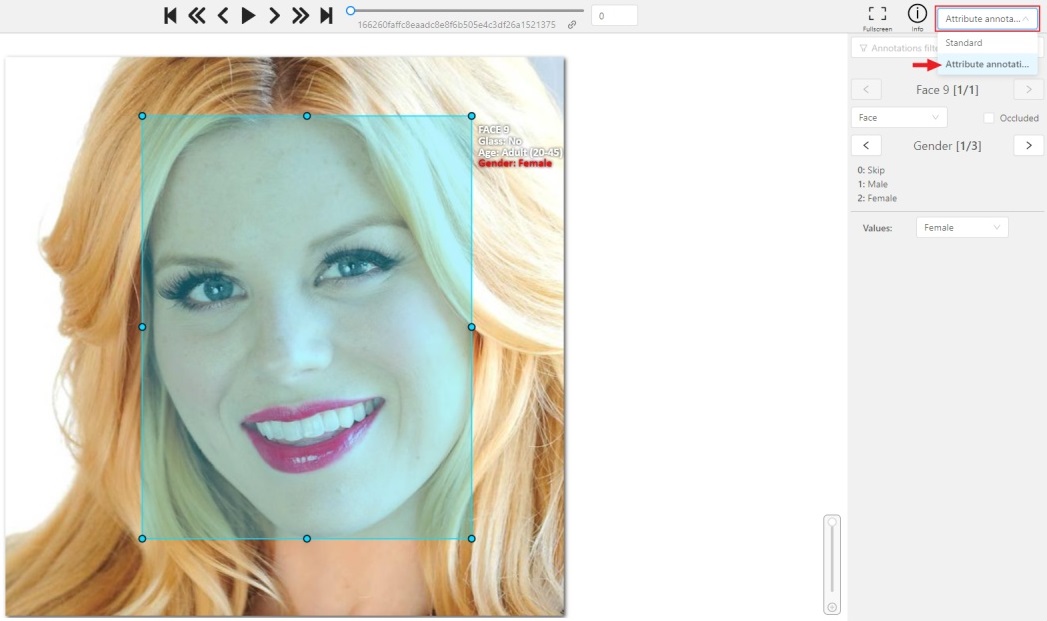
Attribute annotation mode (basics)
-
In this mode you can edit attributes with fast navigation between objects and frames using a keyboard. Open the drop-down list in the top panel and select Attribute annotation Mode.
-
In this mode objects panel change to a special panel :

-
The active attribute will be red. In this case it is
gender. Look at the bottom side panel to see all possible shortcuts for changing the attribute. Press key2on your keyboard to assign a value (female) for the attribute or select from the drop-down list.
-
Press
Up Arrow/Down Arrowon your keyboard or click the buttons in the UI to go to the next/previous attribute. In this case, after pressingDown Arrowyou will be able to edit theAgeattribute.
-
Use
Right Arrow/Left Arrowkeys to move to the previous/next image with annotation.
To see all the hot keys available in the attribute annotation mode, press F2.
Read more in the section attribute annotation mode (advanced).
Downloading annotations
-
To download the latest annotations, you have to save all changes first. click the
Savebutton. There is aCtrl+Sshortcut to save annotations quickly. -
After that, сlick the
Menubutton. -
Press the
Dump Annotationbutton.
-
Choose format dump annotation file. Dump annotation are available in several formats:
- CVAT for video is highlighted if a task has the interpolation mode.
- CVAT for images is highlighted if a task has the annotation mode.

- PASCAL VOC
- (VOC) Segmentation mask — archive contains class and instance masks for each frame in the png format and a text file with the value of each color.
- YOLO
- COCO
- TFRecord
- MOT
- LabelMe 3.0
- Datumaro
Task synchronization with a repository
-
At the end of the annotation process, a task is synchronized by clicking
Synchronizeon the task page. Notice: this feature works only if a git repository was specified when the task was created.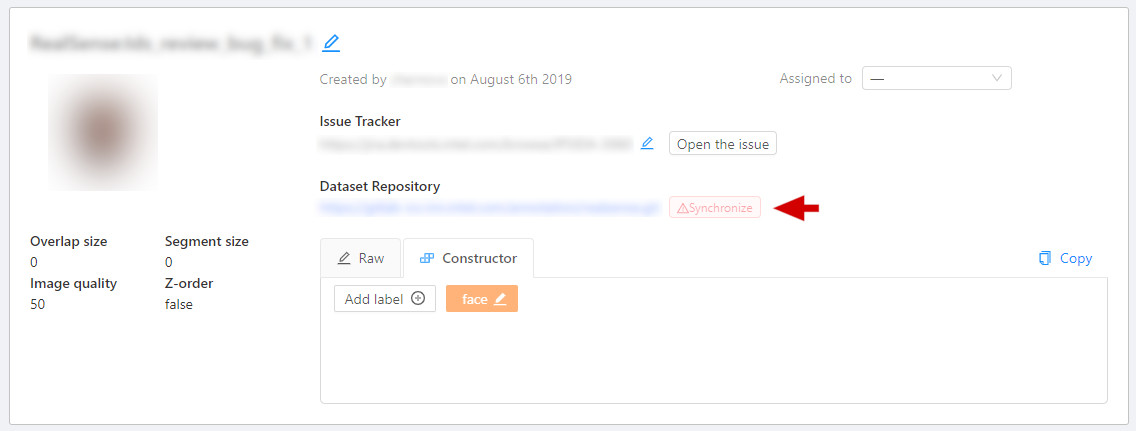
-
After synchronization the button
Syncis highlighted in green. The annotation is now in the repository in a temporary branch.
-
The next step is to go to the repository and manually create a pull request to the main branch.
-
After confirming the PR, when the annotation is saved in the main branch, the color of the task changes to blue.

Vocabulary
Label is a type of an annotated object (e.g. person, car, vehicle, etc.)

Attribute is a property of an annotated object (e.g. color, model, quality, etc.). There are two types of attributes:
-
Unique: immutable and can't be changed from frame to frame (e.g. age, gender, color, etc.)

-
Temporary: mutable and can be changed on any frame (e.g. quality, pose, truncated, etc.)

Track is a set of shapes on different frames which corresponds to one object.
Tracks are created in Track mode
Annotation is a set of shapes and tracks. There are several types of annotations:
- Manual which is created by a person
- Semi-automatic which is created mainly automatically, but the user provides some data (e.g. interpolation)
- Automatic which is created automatically without a person in the loop
Workspace
This is the main field in which drawing and editing objects takes place. In addition the workspace also has the following functions:
-
Right-clicking on an object calls up the
Object card- this is an element containing the necessary controls for changing the label and attributes of the object, as well as the action menu.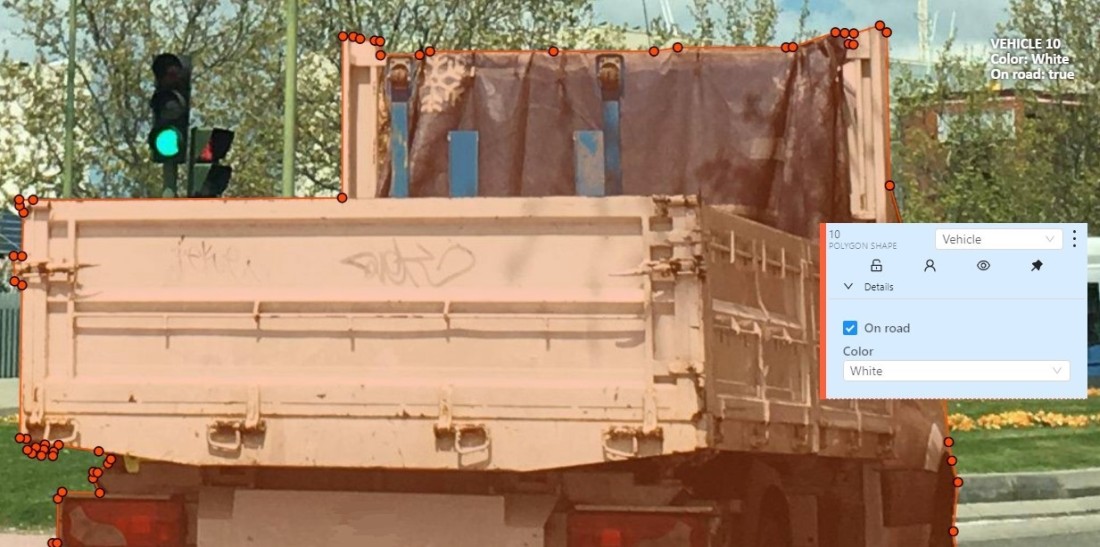
-
Right-clicking a point deletes it.
-
Z-axis slider- Allows you to switch annotation layers hiding the upper layers (slider is enabled if several z layers are on a frame). This element has a button for adding a new layer. When pressed, a new layer is added and switched to it. You can move objects in layers using the+and-keys.
Settings
To open the settings open the user menu in the header and select the settings item or press F3.

Settings have two tabs:
In tab Player you can:
-
Control step of
CandVshortcuts. -
Control speed of
Space/Playbutton. -
Show
Grid, change grid size, choose color and transparency:
-
Show every image in full size or zoomed out like previous (it is enabled by default for interpolation mode and disabled for annotation mode).
-
Rotate all imagescheckbox — switch the rotation of all frames or an individual frame. -
Adjust
Brightness/Contrast/Saturationof too exposed or too dark images usingF3— color settings (changes displaying settings and not the image itself).
Shortcuts:
-
Shift+B+=/Shift+B+-for brightness. -
Shift+C+=/Shift+C+-for contrast. -
Shift+S+=/Shift+S+-for saturation.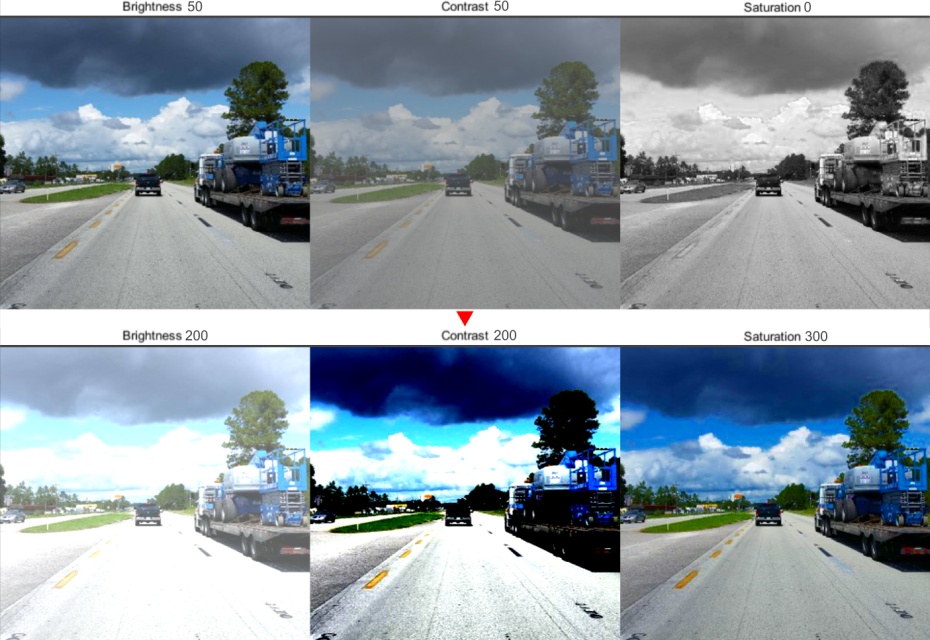
-
Reset color settingsto default values.
In tab Workspace you can:

-
Enable auto savecheckbox — turned off by default. -
Auto save interval (min)input box — 15 minutes by default. -
Show all interpolation trackscheckbox — shows hidden objects on the side panel for every interpolated object (turned off by default). -
Always show object details- show text for an object on the canvas not only when the object is activated: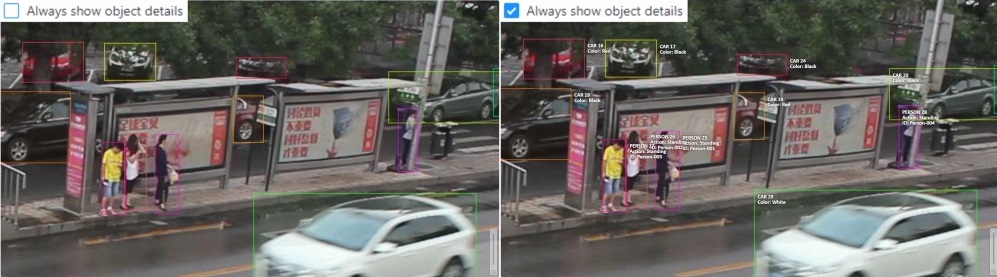
-
Automatic bordering- enable automatic bordering for polygons and polylines during drawing/editing. For more information To find out more, go to the section annotation with polygons. -
Attribute annotation mode (AAM) zoom margininput box — defines margins (in px) for shape in the attribute annotation mode. -
Press
Go backorF3to return to the annotation.
Top Panel

Menu button
It is the main menu of the annotation tool. It can be used to download, upload and remove annotations.

Button assignment:
Dump Annotations— downloads annotations from a task.Upload Annotations— uploads annotations into a task.Remove Annotations— removes annotations from the current job.Export as a dataset— download a data set from a task. Several formats are available:Open the task— opens a page with details about the task.Run ReID merge— automatic merge of shapes or tracks. It is used to combine individual objects - created by automatic annotation in a single track. For more information click here.
Save Work
Saves annotations for the current job. The button has an indication of the saving process.

Undo-redo buttons
Use buttons to undo actions or redo them.

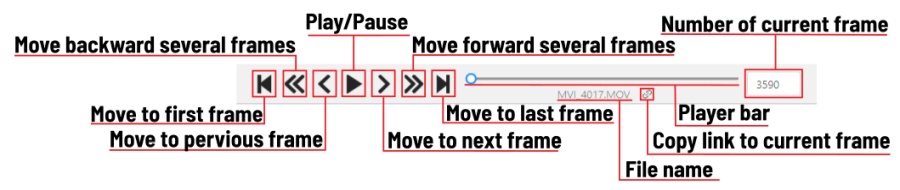
Player
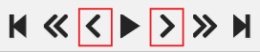
Go to the first /the latest frames.

Go to the next/previous frame with a predefined step. Shortcuts:
V — step backward, C — step forward. By default the step is 10 frames
(change at Account Menu —> Settings —> Player Step).

Go to the next/previous frame (the step is 1 frame). Shortcuts: D — previous, F — next.
Play the sequence of frames or the set of images.
Shortcut: Space (change at Account Menu —> Settings —> Player Speed).

Go to a specific frame. Press ~ to focus on the element.

Fullscreen Player
The fullscreen player mode. The keyboard shortcut is F11.

Info
Open the job info.
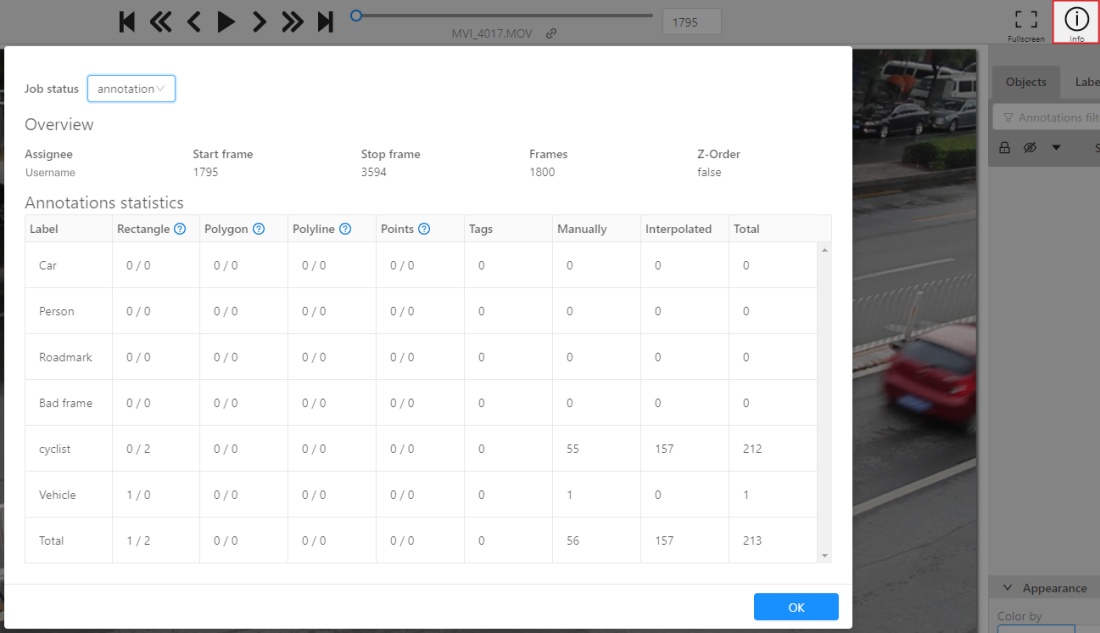
- Job status:
annotation,validationorcompletedtask
Overview:
Assinger- the one to whom the job is assigned.Start Frame- the number of the first frame in this job.End Frame- the number of the last frame in this job.Frames- the total number of all frames in the job.Z-Order- z-order enable indicator.
Annotations statistics:
This is a table number of created shapes, sorted by labels (e.g. vehicle, person) and type of annotation (shape, track). As well as the number of manual and interpolated frames.
UI switcher
Switching between user interface modes.

Controls sidebar
Navigation block - contains tools for moving and rotating images.
| Icon | Description |
|---|---|
 |
Cursor (Esc)- a basic annotation pedacting tool. |
 |
Move the image- a tool for moving around the image withoutthe possibility of editing. |
 |
Rotate- two buttons to rotate the current framea clockwise ( Ctrl+R) and anticlockwise (Ctrl+Shift+R).You can enable Rotate all images in the settings to rotate all the images in the job |
Zoom block - contains tools for image zoom.
| Icon | Description |
|---|---|
 |
Fit image- fits image into the workspace size.Shortcut - double click on an image |
 |
Select a region of interest- zooms in on a selected region.You can use this tool to quickly zoom in on a specific part of the frame. |
Shapes block - contains all the tools for creating shapes.
| Icon | Description | Links to section |
|---|---|---|
 |
Rectangle |
Shape mode; Track mode; Drawing by 4 points |
 |
Polygon |
Annotation with polygons |
 |
Polyline |
Annotation with polylines |
 |
Points |
Annotation with points |
 |
Cuboid |
Annotation with cuboids |
 |
Tag |
Annotation with tagss |
Edit block - contains tools for editing tracks and shapes.
| Icon | Description | Links to section |
|---|---|---|
 |
Merge Shapes(M) — starts/stops the merging shapes mode. |
Track mode (basics) |
 |
Group Shapes (G) — starts/stops the grouping shapes mode. |
Shape grouping |
 |
Split — splits a track. |
Track mode (advanced) |
Objects sidebar
Hide - the button hides the object's sidebar.

Objects
Filter input box
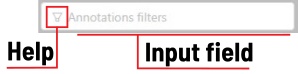
The way how to use filters is described in the advanced guide here.
List of objects

- Switch lock property for all - switches lock property of all objects in the frame.
- Switch hidden property for all - switches hide property of all objects in the frame.
- Expand/collapse all - collapses/expands the details field of all objects in the frame.
- Sorting - sort the list of objects: updated time, ID - accent, ID - descent
In the objects sidebar you can see the list of available objects on the current frame. The following figure is an example of how the list might look like:
| Shape mode | Track mode |
|---|---|
 |
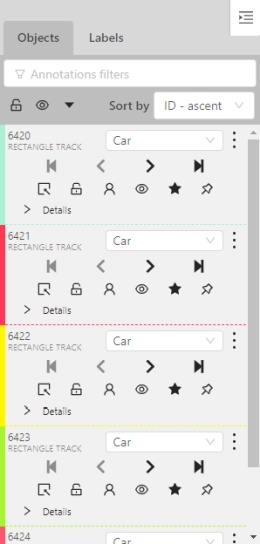 |
Objects on the side bar
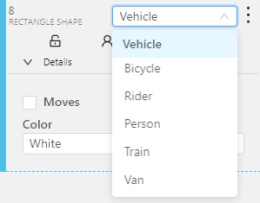
The type of a shape can be changed by selecting Label property. For instance, it can look like shown on the figure below:
Object action menu
The action menu calls up the button:

The action menu contains:
-
Create object URL- puts a link to an object on the clipboard. After you open the link, this object will be filtered. -
Make a copy- copies an object. The keyboard shortcut isCtrl + CCtrl + V. -
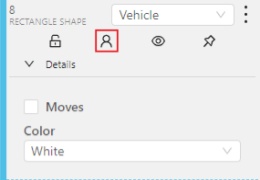
Propagate- Сopies the form to several frames, invokes a dialog box in which you can specify the number of copies or the frame onto which you want to copy the object. The keyboard shortcutCtrl + B.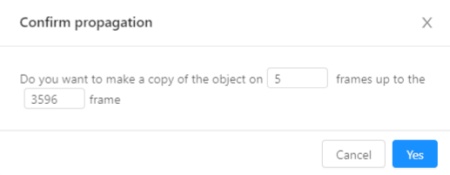
-
To background- moves the object to the background. The keyboard shortcut-,_. -
To foreground- moves the object to the foreground. The keyboard shortcut+,=. -
Remove- removes the object. The keyboard shortcutDel,Shift+Del.
A shape can be locked to prevent its modification or moving by an accident. Shortcut to lock an object: L.

A shape can be Occluded. Shortcut: Q. Such shapes have dashed boundaries.

You can change the way an object is displayed on a frame (show or hide).

Switch pinned property - when enabled, a shape cannot be moved by dragging or dropping.

You can change an object's color. To do so, click on the color bar of the object and select a color from the palette that appears.

By clicking on the Details button you can collapse or expand the field with all the attributes of the object.

Labels
You can also change the color of any object to random, to do so just hover the mouse over the object on the frame and highlight them by clicking on a label you need. In this tab, you can lock or hide objects of a certain label.

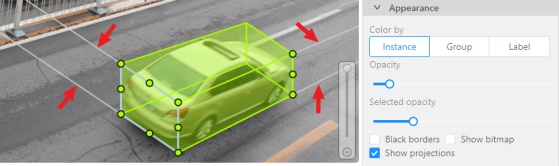
Appearance
Color By options
Change the color scheme of annotation:
-
Instance— every shape has random color
-
Group— every group of shape has its own random color, ungrouped shapes are white
-
Label— every label (e.g. car, person) has its own random color
You can change any random color pointing to a needed box on a frame or on an object sidebar.
Fill Opacity slider
Change the opacity of every shape in the annotation.

Selected Fill Opacity slider
Change the opacity of the selected object's fill.

Black Stroke checkbox
Changes the shape border from colored to black.

Show bitmap checkbox
If enabled all shapes are displayed in white and the background is black.

Show projections checkbox
Enables / disables the display of auxiliary perspective lines. Only relevant for cuboids
Shape mode (advanced)
Basic operations in the mode were described in section shape mode (basics).
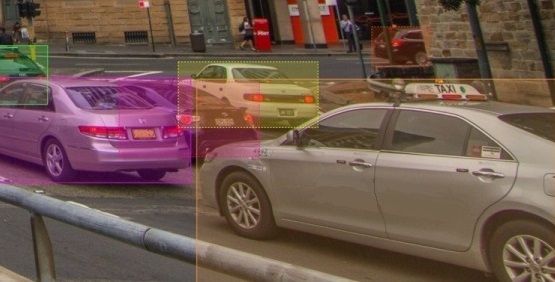
Occluded
Occlusion is an attribute used if an object is occluded by another object or
isn't fully visible on the frame. Use Q shortcut to set the property
quickly.

Example: the three cars on the figure below should be labeled as occluded.
If a frame contains too many objects and it is difficult to annotate them
due to many shapes placed mostly in the same place, it makes sense
to lock them. Shapes for locked objects are transparent, and it is easy to
annotate new objects. Besides, you can't change previously annotated objects
by accident. Shortcut: L.

Track mode (advanced)
Basic operations in the mode were described in section track mode (basics).
Shapes that were created in the track mode, have extra navigation buttons.
-
These buttons help to jump to the previous/next keyframe.

-
The button helps to jump to the initial frame and to the last keyframe.

You can use the `` Split '' function to split one track into two tracks:

Attribute annotation mode (advanced)
Basic operations in the mode were described in section attribute annotation mode (basics).
It is possible to handle lots of objects on the same frame in the mode.
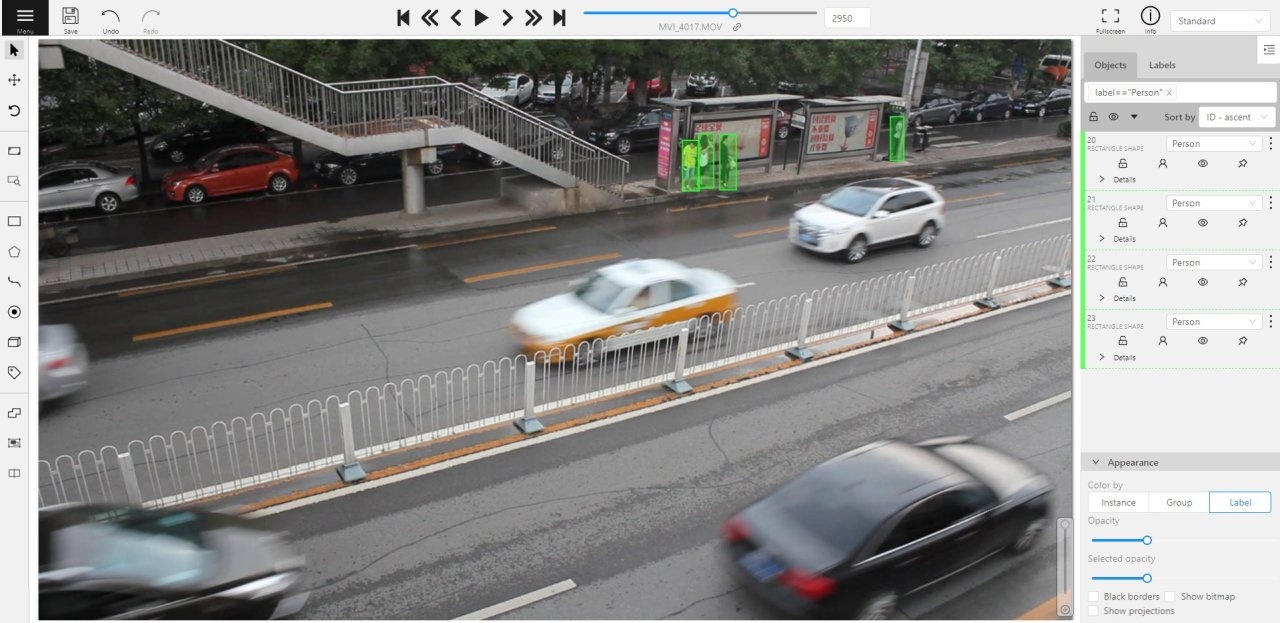
It is more convenient to annotate objects of the same type. In this case you can apply
the appropriate filter. For example, the following filter will
hide all objects except person: label=="Person".
To navigate between objects (person in this case),
use the following buttons switch between objects in the frame on the special panel:
or shortcuts:
Tab— go to the next objectShift+Tab— go to the previous object.
In order to change the zoom level, go to settings (press F3)
in the workspace tab and set the value Attribute annotation mode (AAM) zoom margin in px.
Annotation with rectangle by 4 points
It is an efficient method of bounding box annotation, proposed here. Before starting, you need to make sure that the drawing method by 4 points is selected.
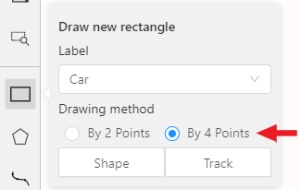
Press Shape or Track for entering drawing mode. Click on four extreme points:
the top, bottom, left- and right-most physical points on the object.
Drawing will be automatically completed right after clicking the fourth point.
Press Esc to cancel editing.

Annotation with polygons
It is used for semantic / instance segmentation.
Be sure Z-Order flag in Create new task dialog is enabled if you want to
annotate polygons. Z-Order flag defines order of drawing. It is necessary to
get right annotation mask without extra work (additional drawing of borders).
Z-Order can be changed by +/- which set maximum/minimum z-order
accordingly.

Before starting, you need to be sure that Polygon is selected.

Press N for entering drawing mode. There are two ways to draw a polygon
— you either create points by clicking or by dragging mouse on the screen
holding Shift.
| Clicking points | Holding Shift+Dragging |
|---|---|
 |
 |
When Shift isn't pressed, you can zoom in/out (when scrolling the mouse
wheel) and move (when clicking the mouse wheel and moving the mouse), you can
delete the previous point clicking right mouse button. Press N again for
completing the shape. You can move points or delete them by double-clicking.
Double-click with pressed Shift will open a polygon editor. There you can
create new points (clicking or dragging) or delete part of a polygon closing
the red line on another point. Press Esc to cancel editing.

Also, you can set fixed number of points in the "poly shape size" field, then
drawing will be stopped automatically. To enable dragging, you should right-click
inside polygon and choose Enable Dragging.
Below you can see results with opacity and black stroke:

Also, if you need to annotate small objects, increase Image Quality to
95 in Create task dialog for annotator's convenience.
Annotation with polylines
It is used for road markup annotation etc.
Before starting, you need to select the Polyline. You can set a fixed number of points
in the Number of points field, then drawing will be stopped automatically.
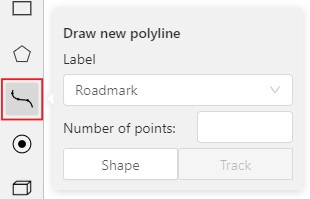
Click Shape to enter drawing mode. There are two ways to draw a polyline —
you either create points by clicking or by dragging a mouse on the screen while holding Shift.
When Shift isn't pressed, you can zoom in/out (when scrolling the mouse wheel)
and move (when clicking the mouse wheel and moving the mouse), you can delete
previous points by right-clicking on it. Press N again to complete the shape.
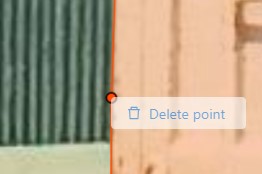
You can delete a point by double-clicking on it with pressed Ctrl or right-clicking on a point
and selecting Delete point. Double-click with pressed Shift will open a polyline editor.
There you can create new points(by clicking or dragging) or delete part of a polygon closing
the red line on another point. Press Esc to cancel editing.

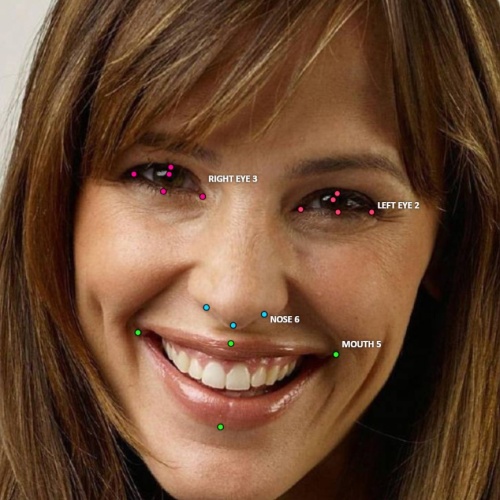
Annotation with points
Points in shape mode
It is used for face, landmarks annotation etc.
Before you start you need to select the Points. If necessary you can set a fixed number of points
in the Number of points field, then drawing will be stopped automatically.
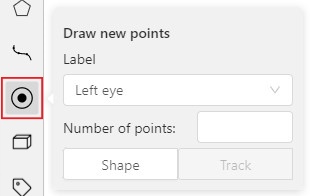
Click Shape to entering the drawing mode. Now you can start annotation of the necessary area.
Points are automatically grouped — all points will be considered linked between each start and finish.
Press N again to finish marking the area. You can delete a point by double-clicking with pressed Ctrl
or right-clicking on a point and selecting Delete point. Double-clicking with pressed Shift will open the points
shape editor. There you can add new points into an existing shape. You can zoom in/out (when scrolling the mouse wheel)
and move (when clicking the mouse wheel and moving the mouse) while drawing. You can drag an object after
it has been drawn and change the position of individual points after finishing an object.
Linear interpolation with one point
You can use linear interpolation for points to annotate a moving object:
-
Before you start, select the
Points. -
Linear interpolation works only with one point, so you need to set
Number of pointsto 1. -
After that select the
Track.
-
Click
Trackto enter the drawing mode left-click to create a point and after that shape will be automatically completed.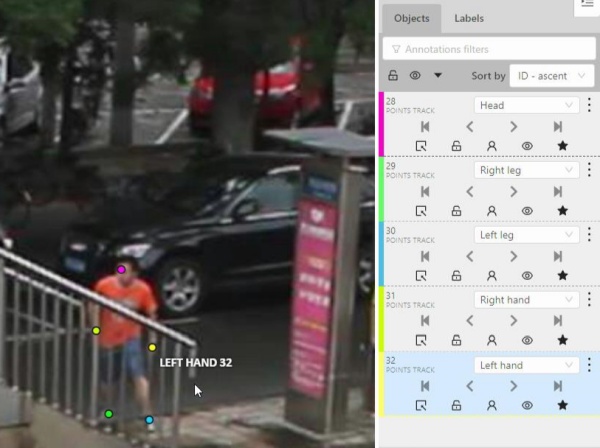
-
Move forward a few frames and move the point to the desired position, this way you will create a keyframe and intermediate frames will be drawn automatically. You can work with this object as with an interpolated track: you can hide it using the
Outside, move around keyframes, etc.
-
This way you'll get linear interpolation using the
Points.
Annotation with cuboids
It is used to annotate 3 dimensional objects such as cars, boxes, etc... Currently the feature supports one point perspective and has the contraint where the vertical edges are exactly parallel to the sides.
Creating the cuboid
Before starting, you have to be sure that Cuboid is selected.
Press N for entering drawing mode. There are many ways to draw a cuboid.
You may draw the cuboid by placing 4 points, after which the drawing completes automatically.
The first 3 points will represent a plane of the cuboid
while the last point represents the depth of that plane.
For the first 3 points, it is recomended to only draw the 2 closest side faces,
as well as the top and bottom face.
A few examples:


Editing the cuboid
The cuboid can be edited in multiple ways, by dragging points or by dragging certain faces. First notice that there is a face that is painted with pink lines only, let us call it the front face.
The cuboid can be moved by simply dragging the shape as normal. The cuboid can be extended by dragging on the point in the middle of the edges. The cuboid can also be extended up and down by dragging the point at the vertices.

To draw with perpective effects it is assumed that the front face is the closest to the camera.
To begin simply drag the points on the vertices that are not on the pink/front face while holding Shift.
The cuboid can then be edited as usual.

If you wish to reset perspective effects, you may right click on cuboid,
and select Reset Perspective to return to a regular cuboid.
The location of the pink face can be swapped with the adjacent visible side face.
This is done by right clicking on the cuboid and selecting Switch Perspective Orientation.
Note that this will also reset the perspective effects.

Certain faces of the cuboid can also be edited, these faces are the left, right and dorsal faces, relative to the pink face. Simply drag the faces to move them independently from the rest of the cuboid.

Annotation with Auto Segmentation
Used to create a polygon semi-automatically. Before starting, you have to be
sure that Auto Segmentation is selected.
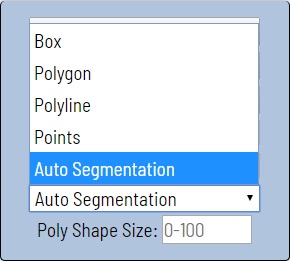
Press N for entering drawing mode. Now you can start annotating the necessary area.
Press N again for finishing marking an area. A shape must consist of 4
points minimum. You can set a fixed number of points in the field
"poly shape size", then drawing will be stopped automatically. You can zoom
in/out (when scrolling the mouse wheel) and move (when clicking the mouse
wheel and moving the mouse) while drawing. At the end of Auto Segmentation,
a shape is created and you can work with it as a polygon.
Annotation with Tags
Used to annotate frames, does not have a shape in the workspace. Before you start, you have to make sure that Tag is selected.

Click tag to create. You can work with Tag only on the sidebar. You can use the lock function and change label and attribute. Other functions such as propagate, make a copy and remove are available in the action menu.
Automatic annotation
Automatic Annotation is used for creating preliminary annotations.
To use Automatic Annotation you need a DL model. You can use primary models or models uploaded by a user.
You can find the list of available models in the Models section.
-
To launch automatic annotation, you should open the dashboard and find a task which you want to annotate. Then click the
Actionsbutton and choose optionAutomatic Annotationfrom the dropdown menu.
-
In the dialog window select a model you need. DL models are created for specific labels, e.g. the Crossroad model was taught using footage from cameras located above the highway and it is best to use this model for the tasks with similar camera angles. If it's necessary select the
Clean old annotationscheckbox. Adjust the labels so that the task labels will correspond to the labels of the DL model. For example, let’s consider a task where you have to annotate labels “car” and “person”. You should connect the “person” label from the model to the “person” label in the task. As for the “car” label, you should choose the most fitting label available in the model - the “vehicle” label. The task requires to annotate cars only and choosing the “vehicle” label implies annotation of all vehicles, in this case using auto annotation will help you complete the task faster. ClickSubmitto begin the automatic annotation process.
-
At runtime - you can see the percentage of completion. You can cancel the automatic annotation by clicking on the
Cancelbutton.
-
The end result of an automatic annotation is an annotation with separate rectangles (or other shapes)
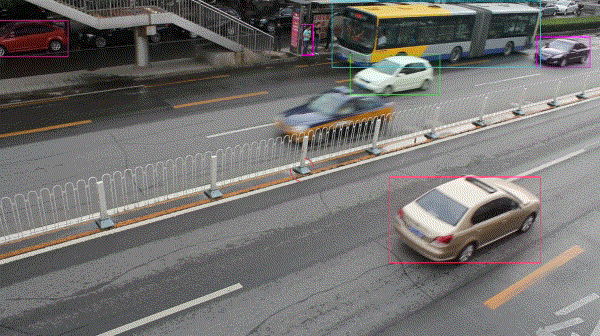
-
Separated bounding boxes can be edited by removing false positives, adding unlabeled objects and merging into tracks using
ReID mergefunction. Click theReID mergebutton in the menu. You can use the default settings (for more information click here). To launch the merging process clickMerge. Each frame of the track will be a key frame.
-
You can remove false positives and edit tracks using
SplitandMergefunctions.
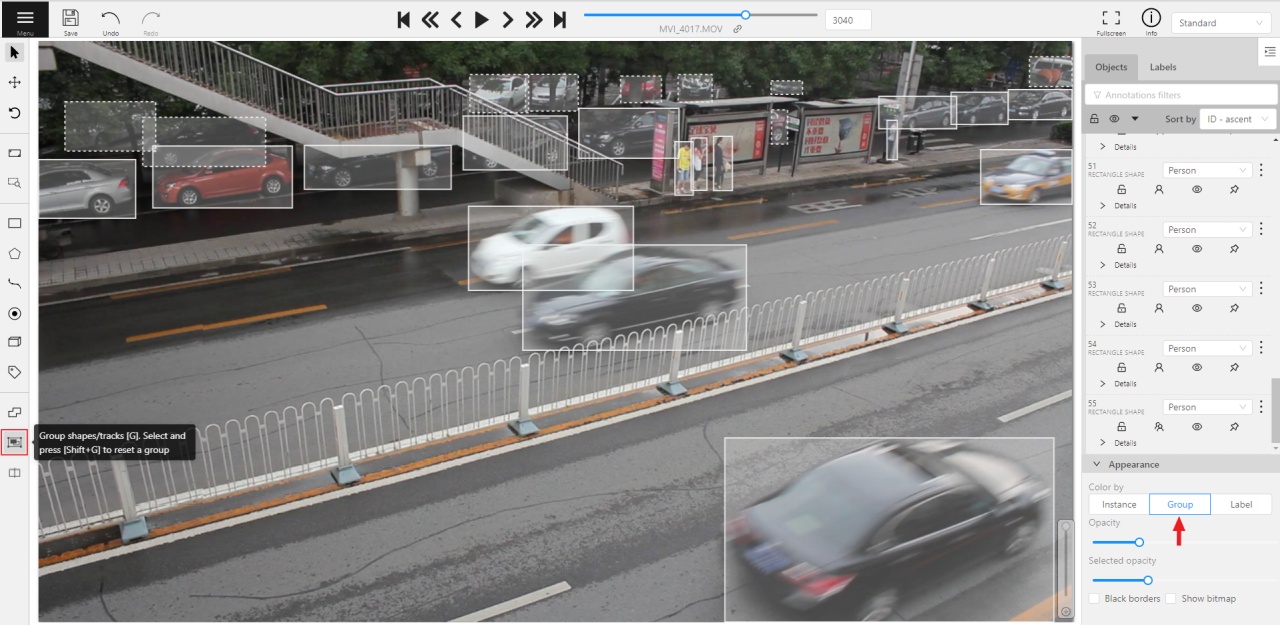
Shape grouping
This feature allows us to group several shapes.
You may use the Group Shapes button or shortcuts:
G— start selection / end selection in group modeEsc— close group modeShift+G— reset group for selected shapes
You may select shapes clicking on them or selecting an area.
Grouped shapes will have group_id filed in dumped annotation.
Also you may switch color distribution from an instance (default) to a group.
You have to switch Color By Group checkbox for that.
Shapes that don't have group_id, will be highlighted in white.

Filter
There are some reasons to use the feature:
- When you use a filter, objects that don't match the filter will be hidden.
- Fast navigation between frames that have an object of interest. Use
Left Arrow/Right Arrowkeys for the purpose. If the filter is empty, the arrows go to previous/next frames which contain any objects. - The list contains frequently used and recent filters.
To use the functionality, it is enough to specify a value inside Filter text
box and defocus the text box (for example, click on the image). After that, the
filter will be applied.
In the trivial case, the correct filter must match the template: label[prop operator "value"]
label is a type of an object (e.g. person, car, face, etc.). If the type isn't important, you can use *.
prop is a property which should be filtered. The following items are available:
id— identifier of an object. It helps to find a specific object easily in case of huge number of objects and images or frames.type— an annotation type. Possible values:annotation,interpolationlockacceptstrueandfalsevalues. It can be used to hide all locked objects.occludedacceptstrueandfalsevalues. It can be used to hide all occluded objects.attris a prefix to access attributes of an object. For example, it is possible to access race attribute. For the purpose you should specifyattr/race. To access all attributes, it is necessary to writeattr/*.
operator can be = (equal), != (not equal), < (less), >
(more), <= (less or equal), >= (more or equal).
"value" — value of an attribute or a property. It has to be specified in quotes.
| Example | Description |
|---|---|
face |
all faces |
*[id=4] |
object with id #4 |
*[type="annotation"] |
annotated objects only |
car[occluded="true"] |
cars with occluded property |
*[lock!="true"] |
all unlocked objects |
car[attr/parked="true"] |
parked cars |
*[attr/*="__undefined__"] |
any objects with __undefined__ value of an attribute |
*[width<300 or height<300] |
shape less than 300 pixels wide and more than 200 pixels high |
The functionality allows to create more complex conditions. Several filters can
be combined by or, and, | operators. Operators or, and can
be applied inside square brackets. | operator (union) can be applied
outside of square brackets.
| Example | Description |
|---|---|
person[attr/age>="25" and attr/age<="35"] |
people with age between 25 and 35. |
face[attr/glass="sunglass" or attr/glass="no"] |
faces with sunglasses or without glasses at all. |
person[attr/race="asian"] | car[attr/model="bmw" or attr/model="mazda"] |
asian persons or bmw or mazda cars. |
Analytics
If your CVAT instance is created with analytics support, you can press the "analytics" button in dashboard, a new tab with analytics and journals will be opened.

It allows you to see how much working time every user spend on each task and how much they did, over any time range.

It also has activity graph which can be modified with number of users shown and timeframe.

Shortcuts
Many UI elements have shortcut hints. Put your pointer to a required element to see it.

| Shortcut | Common |
|---|---|
F1 |
open help |
F1 in dashboard |
open page with documentation |
F2 |
open settings |
L |
lock/unlock an active shape |
L+T |
lock/unlock all shapes on the current frame |
Q or Num/ |
set occluded property for an active shape |
N |
start/stop draw mode |
Esc |
close draw mode without create |
Ctrl+<number> |
change type of an active shape |
Shift+<number> |
change type of new shape by default |
Alt + > |
switch next default shape type |
Alt + < |
switch previous default shape type |
Enter |
change color of active shape |
H |
hide active shape |
T+H |
hide all shapes |
J |
hide labels with attributes on every frame |
Delete |
delete an active shape |
Shift+Delete |
delete an active shape even if it is locked |
F |
go to next frame |
D |
go to previous frame |
V |
go forward with a predefined step |
C |
go backward with a predefined step |
~ |
focus to go to frame element |
Ctrl + R |
clockwise image rotation |
Ctrl + Shift + R |
counter clockwise image rotation |
Ctrl+C |
copy an active shape |
Ctrl+V |
insert a copied shape |
Ctrl+Z |
undo previous action |
Ctrl+Shift+Z/Ctrl+Y |
redo previous action |
Shift+B/Alt+B |
increase/decrease brightness on an image |
Shift+C/Alt+C |
increase/decrease contrast on an image |
Shift+S/Alt+S |
increase/decrease saturation on an image |
Alt + G + '+', Alt + G + '-' |
increase/decrease grid opacity |
Alt + G + Enter |
change grid color |
Ctrl+S |
save job |
Ctrl+B |
propagate active shape |
+/- |
change relative order of highlighted box (if Z-Order is enabled) |
| Interpolation | |
M |
enter/apply merge mode |
Esc |
close merge mode without apply the merge |
R |
go to the next key frame of an active shape |
E |
go to the previous key frame of an active shape |
O |
change attribute of an active shape to "Outside the frame" |
K |
mark current frame as key frame on an active shape |
| Attribute annotation mode | |
Shift+Enter |
enter/leave Attribute Annotation mode |
Up Arrow |
go to the next attribute (up) |
Down Arrow |
go to the next attribute (down) |
Tab |
go to the next annotated object |
Shift+Tab |
go to the previous annotated object |
<number> |
assign a corresponding value to the current attribute |
| Grouping | |
G |
switch group mode |
Esc |
close group mode |
Shift+G |
reset group for selected shapes |
| Filter | |
Left Arrow |
go to the previous frame which corresponds to the specified filter value |
Right Arrow |
go to the next frame which corresponds to the specified filter value |
Hints
Hold Mouse Wheel to move frame (for example, while drawing)
Hold Ctrl when shape is active and fix it.
Hold Ctrl when paste shape from buffer for multiple pasting.